KickoffLabs lets you easily implement Facebook conversion tracking using the Facebook Pixel. This document follows best practices provided by Facebook. Setting up this integration you can:
- Track the conversion performance of paid Facebook ads driving traffic to your landing pages.
- Remarket to people on Facebook who have already visited your pages.
- Create similar custom audiences based on people who signup for your campaign.
- Get additional insights in Facebook about the people visiting your campaign.
Properly installing the Facebook Pixel consists of two steps (click and scroll to a section):
- Step 1: Install the Facebook Pixel Base Code to your campaign.
- Step 2: Setup conversion tracking events. Generally, only on the status page.
NOTE: To properly setup conversion tracking you MUST use a dedicated status page.
DO NOT use KickoffLabs Instant Thanks (“On Your Landing Page” option). It will cause errors in your reports.
**Please note this feature is available starting on paid Premium level and higher plans.**
Before We Start
Facebook has recently updated their TOS to require domain verification when tracking conversion events. Domain Verification allows you to confirm with Facebook that you own the domain that you are using the pixel with. See more about domain verification here.
By default (and on the KickoffLabs Free tier) we publish the pages to a .kickoffpages.com subdomain. Unfortunately, as a domain’s ownership cannot be claimed by more than one person, the .kickoffpages.com subdomain cannot be used. Instead, you will need to connect a custom domain/subdomain of your choosing to publish your KickoffLabs pages to and verify the custom domain with Facebook.
Custom domain connection is available on all KickoffLabs paid plans.
Step 1: Install the Facebook Pixel Base Code to your campaign:
You first need to install the Facebook pixel code to all pages under your campaign, this will track visits to every page.
- Create the Facebook Pixel.
- Copy the entire Pixel Base Code provided by Facebook.
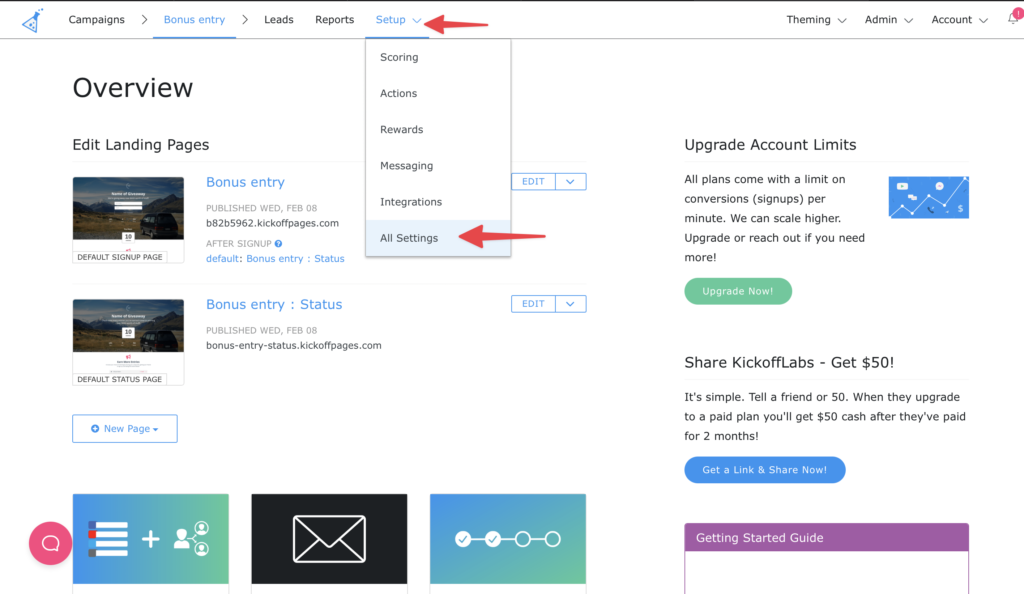
- From your KickoffLabs campaign select “Setup” then “All Settings” from the top menu.

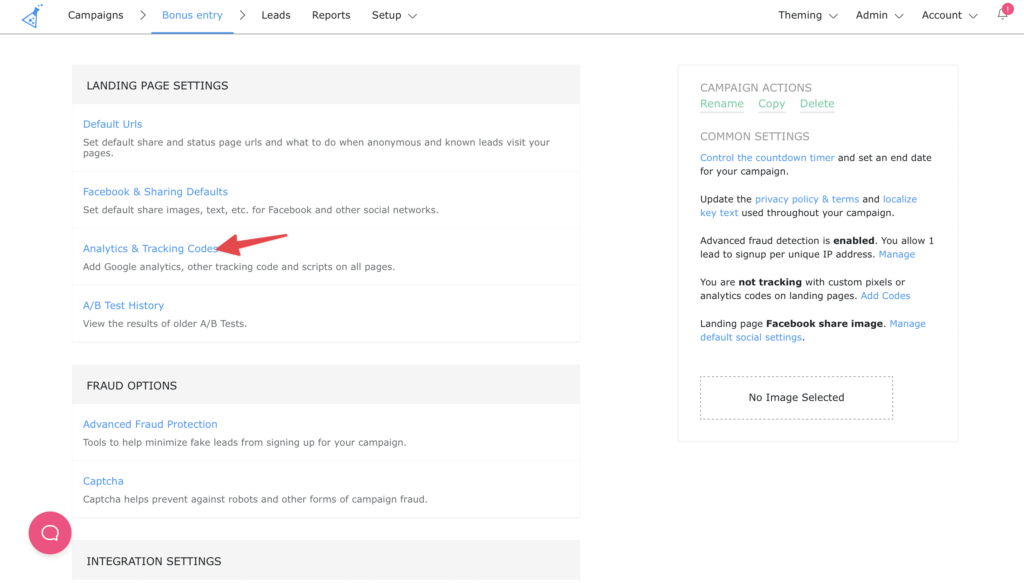
- Next Select “Analytics & Tracking Codes” from the left side.

- Paste the Facebook Tracking code into the Header Scripts area.

Click “Save Tracking Codes”  Now the basic Facebook pixel will be published to all of your current landing pages and any new pages you create and publish.
Step 2: Setup conversion tracking events
A. For multi-page contests
Next, you need to install the conversion tracking code on the pages where you want to track events. More often than not, this will be the status page.
Facebook offers several conversion tracking events. Using KickoffLabs, you’ll generally only want to track the ‘Lead’ event. This lets you track when a user expresses interest in your offering, like when they sign up for your KickoffLabs campaign.
Here’s how to add this event to all of your status pages.
- Copy the ‘fbq(‘track’, ‘Lead’);’ code provided by Facebook and make sure it’s wrapped in a script block.
<script>fbq('track', 'Lead');</script> - From your campaign dashboard, click on campaign settings again.
- In the settings click to open “Landing Page Analytics and Tracking Codes” like you did above.
- Scroll down and paste/add the ‘Lead’ event into the Footer Conversion Tracking section. It should end up looking like this:

- Finally, scroll down and click ‘Save Tracking Codes‘.
B. For Single Page Contests
When you set the confirmation on a landing page to “on page” or “contest box” you’ll need to add the following script to the page footer.
That’s it! You’ve properly installed the Facebook Pixel.
Troubleshooting:
- If you’re having trouble installing, use the Facebook Pixel Helper tool to help validate your Facebook Pixel.
- If you’re receiving an error or the pixel isn’t tracking, try only using the portion of the script between (and including) the <script></script> tags. Do NOT include the <noscript></noscript> portion.
Need help? Email support@kickofflabs.com