Connect custom domains, DNS, SSL, and redirects
Use this guide to publish KickoffLabs pages on your own domain. It consolidates the general setup, provider-specific DNS notes, SSL, forwarding, and troubleshooting articles.
Overview
Section titled “Overview”Use a custom domain when you want your KickoffLabs landing page to live on your own domain instead of a default KickoffLabs/KickoffPages URL.
Choose the right domain setup
Section titled “Choose the right domain setup”Before editing DNS, decide where the campaign should live.
If you do not have a website yet
Section titled “If you do not have a website yet”Use KickoffLabs as the primary site for the launch.
- Primary website: publish to
www.yourdomain.com. - Root domain: publish to
yourdomain.comusing the DNS records KickoffLabs provides. - Page paths: publish multiple pages under the same domain, such as
www.yourdomain.com/signupandwww.yourdomain.com/thank-you.
If you already have a website
Section titled “If you already have a website”Keep your main site where it is and publish KickoffLabs on a subdomain.
- Separate subdomain: publish to
signup.yourdomain.com,contest.yourdomain.com, orpages.yourdomain.com. - Subdomain plus path: publish multiple pages such as
promotions.yourdomain.com/giveawayandpromotions.yourdomain.com/win. - Existing-site form: keep the page on your site and connect it with AnyForm.
- Popup campaign: skip domain setup and run a popup box on your existing site.
Add the domain in KickoffLabs
Section titled “Add the domain in KickoffLabs”- Open your KickoffLabs account.
- Go to the account/domain settings area.
- Enter the domain or subdomain you want to use.
- Select Add New Domain Name.
KickoffLabs will generate the DNS records you need. Depending on the domain type, this may be a CNAME record or A/AAAA records.
Update DNS at your domain provider
Section titled “Update DNS at your domain provider”Add the DNS records KickoffLabs gives you wherever your DNS is hosted. That may be your registrar, hosting company, or DNS provider.
Common provider guides:
- GoDaddy subdomain setup
- GoDaddy
wwwdomain setup - Namecheap DNS management
- Cloudflare DNS setup
- Bluehost DNS management
- DreamHost DNS management
- cPanel DNS management
For Cloudflare, a CNAME record is usually preferred because Cloudflare supports CNAME flattening.
Verify and publish
Section titled “Verify and publish”After DNS is updated:
- Wait for DNS to propagate. This can be quick, but some providers take longer.
- Return to KickoffLabs and check the domain status.
- Publish or republish the landing page to the custom domain.
- Visit the live URL in a fresh browser window.
- Confirm SSL is active. If SSL is not ready yet, wait and check again.
Related docs:
- Publishing your page to a custom domain
- Enable SSL for custom domains
- Why isn’t my custom domain working?
General Custom Domain Setup Guide
Section titled “General Custom Domain Setup Guide”To use your own domain URL for your landing page you’ll need to tell the internet about KickoffLabs. This is generally done at the provider you bought your domain from. So, if you bought your domain from GoDaddy, you’d have to make these changes there. Click here to read more about URL strategies for a product/business pre-launch. There are three steps involved.
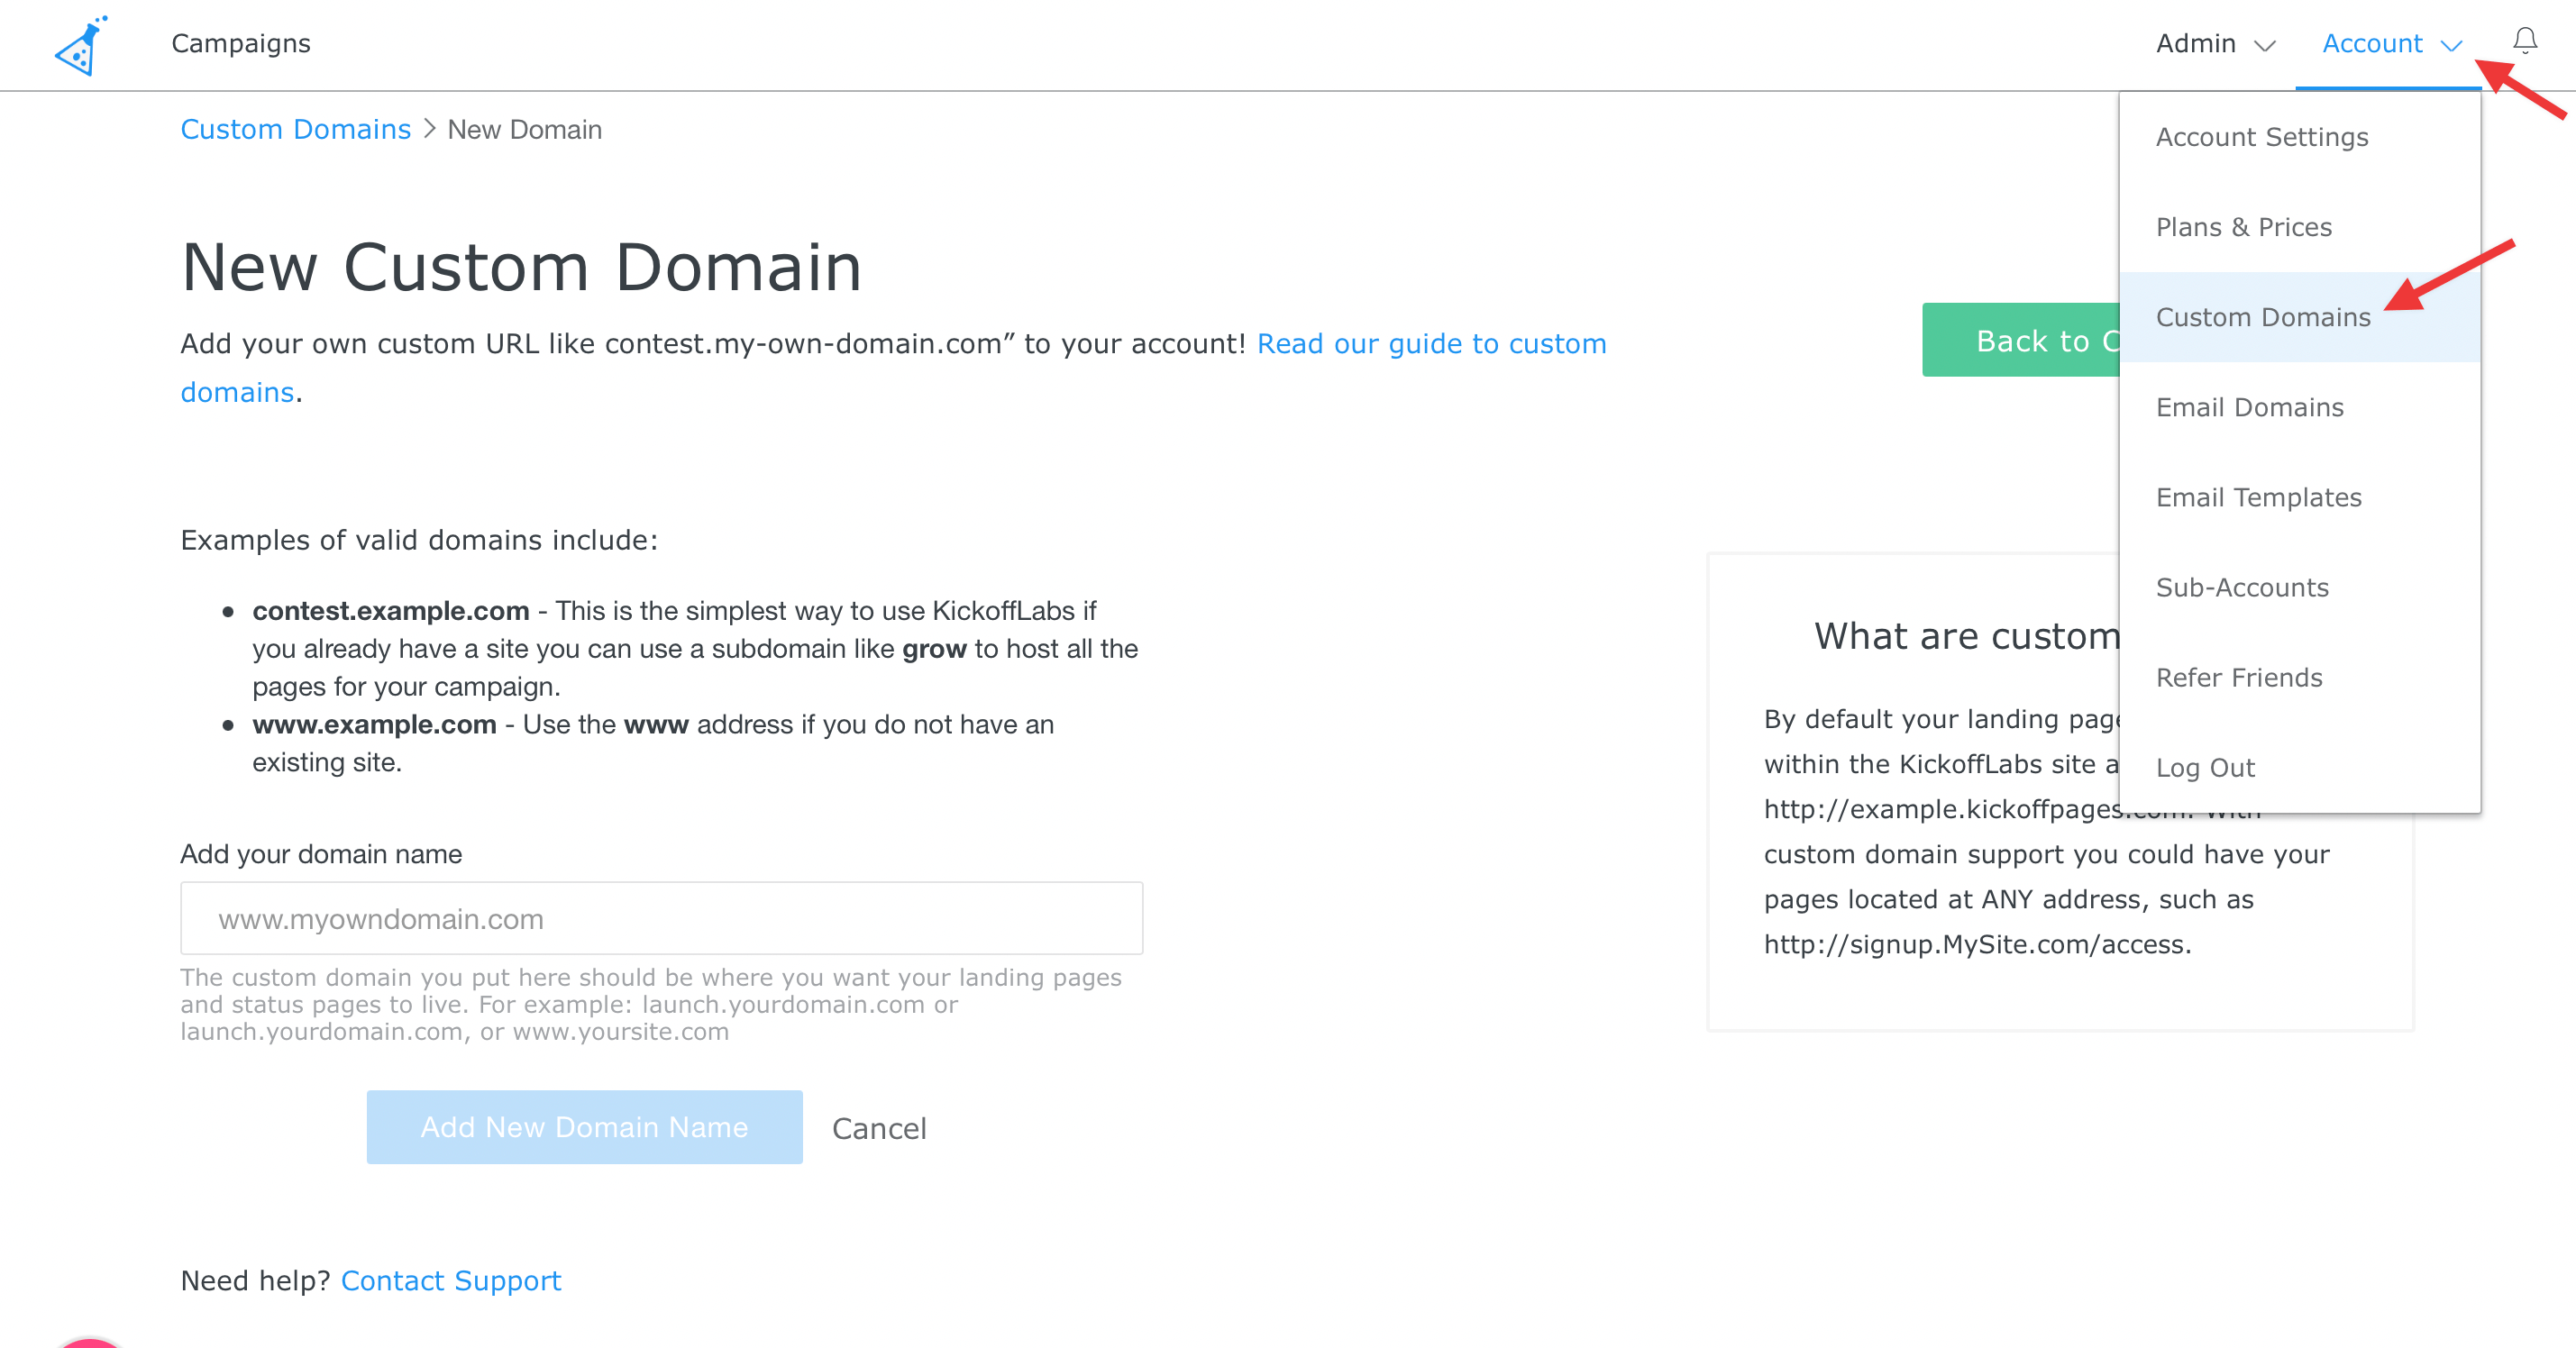
- Tell us what domain you’ll be using. (From your dashboard select the “Account” tab from the top menu >“Custom Domains” from the drop-down)
- Tell the internet about KickoffLabs by adding what’s known as a CNAME entry to that domains DNS settings. (What is described here). We also support A and AAA records to point the root domain (non-www) to us as-well.
- Connect the domain to a landing page of your choosing through the Page Settings - step by step guide here!
You’ll get specific step by step instructions for your domain after you tell us what it is. What follows here is a generalization of the settings that need to be changed at your domain provider (Step 2). They are generally under settings labeled “DNS Manager” or “Edit Host Records”
Using the WWW address ( https://www.site.com ) This is often used in combination with us…
Section titled “Using the WWW address ( https://www.site.com ) This is often used in combination with us…”ing the root domain. Many of your users are still in the habit of entering www. into the browser. For the WWW address to work you must **create the CNAME in your DNS control panel.*To find your custom CNAME: Go to the KickoffLabs Account tab and select “Custom Domains” from the drop-down menu. Then, click “Check Status and Manage.” Your CNAME will be under the “Points To” column. *** There should be NO other CNAME records for www host. There should also be no A Records on www as well. When using www, you will need to set up a root level domain redirect in order to enable your site to be accessible with and without the www.
Using a Root level domain We now support A and AAA records for connecting a domain witho…
Section titled “Using a Root level domain We now support A and AAA records for connecting a domain witho…”ut the www. Please note that some DNS providers require you to use ”@” for the host instead of what we generate. If that’s the case, simply use ”@” for your host and keep the “points to” records that we’ve generated the same.
Using a custom subdomain ( https://signup.site.com ) This is perfect if you already have…
Section titled “Using a custom subdomain ( https://signup.site.com ) This is perfect if you already have…”a website and want to host landing pages on a separate URL from your main site. Lets assume you want the signup.site.com address as shown: For a signup address to work you must create the following CNAME in your DNS control panel. Host:** signup Points to: (Your Custom CNAME) ***locate your CNAME in the Custom Domains section of your KickoffLabs account. There should be NO other CNAME records for signup host. There should also be no A Records on signup address as well. Please keep in mind that when using a subdomain other than www, it’s not necessary (or recommended!) to include www along with the subdomain. In most cases, this will actually break the connection. Find specific guides for common domain providers here We do our best to keep these guides updated, however, companies change their user interfaces often, and it can be difficult to keep up! If you’re having trouble, you can reach out to either support@kickofflabs.com or your domain provider for assistance with pointing your domain to KickoffLabs. Important Note for Customers with Existing Domains: If you already have your page running on the proxy.kickofflabs.com CNAME it may take a little while for the DNS changes to fully propagate. How long depends on your the TTL of your DNS provider. A safe estimate is usually double what time it says. During this time anything you have published to this domain will still be available. For existing domains, do NOT change your DNS without first having your domain migrated in the dashboard. Failure to do this may cause your page to be unavailable. Reach out to us at support@kickofflabs.com to migrate your existing domain for SSL support. If you have trouble setting up your domain, or have any questions in general send an email to support@kickofflabs.com
Publish a page to your domain
Section titled “Publish a page to your domain”Publishing your pages to your custom domain is as easy as following the instructions below. This guide assumes you’ve already made the required update to your DNS Settings to point your domain to our service. If you have not, learn how to set up your domain for use with KickoffLabs.
Add your custom domain to your KickoffLabs account
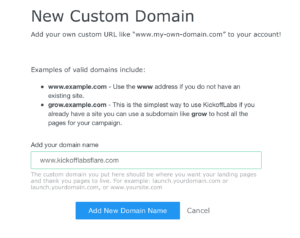
Section titled “Add your custom domain to your KickoffLabs account”From the top menu of your Campaign Dashboard, click the “Account” tab. Then, click “Custom Domains.” 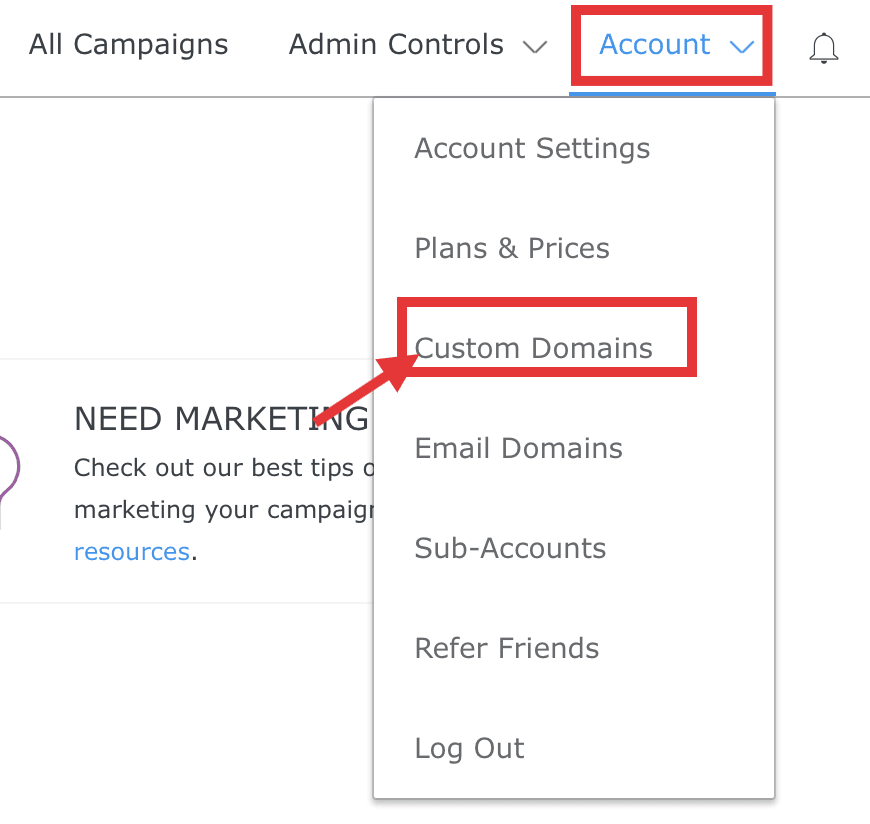 Click the “Add Domain” button to add your custom domain to your account. Enter your custom domain into the available field and click the blue “Add New Domain Name” button. If you’re using your root domain, be sure to include www. If you’re using any subdomain OTHER than www, we do not recommend you include www with the subdomain (so, signup.kickofflabs.com, NOT www.signup.kickofflabs.com)
 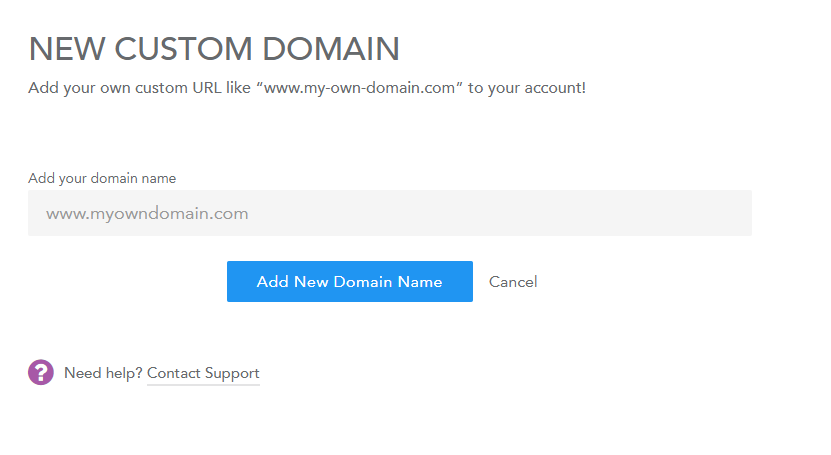 Now that you’re domain has been added to your account, it’s time to publish your page(s) to your custom domain!
Publish your page(s) to your custom domain
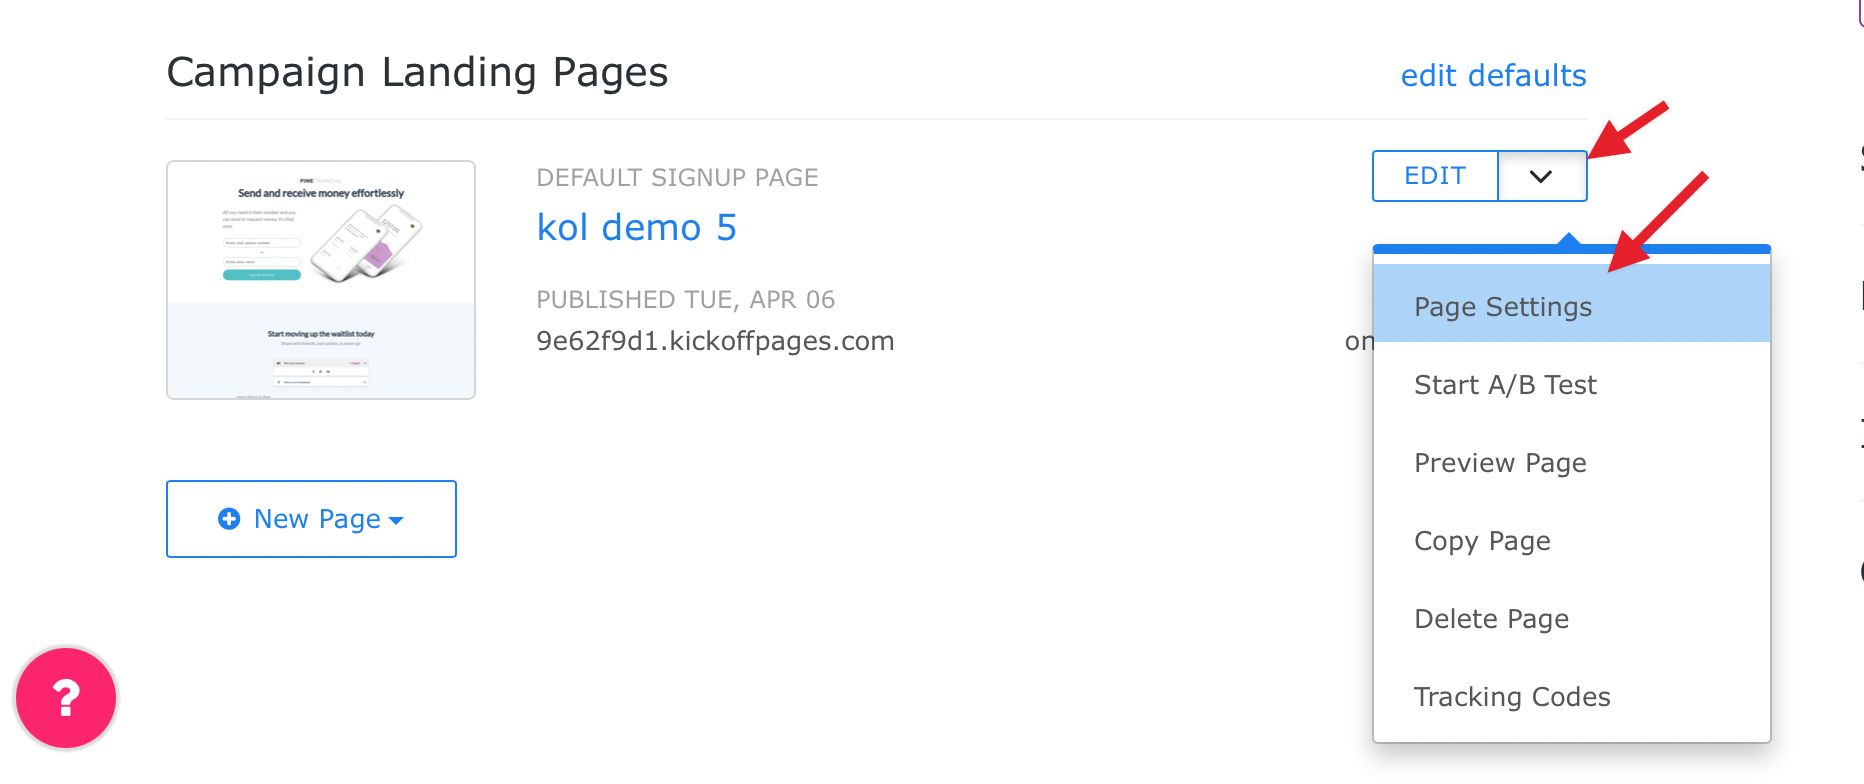
Section titled “Publish your page(s) to your custom domain”From the top menu, click “All Campaign”, then select your campaign from the available list. Find the page you wish to publish in the list. Use the arrow icon off to the right and select “Page Settings” from the drop-down menu.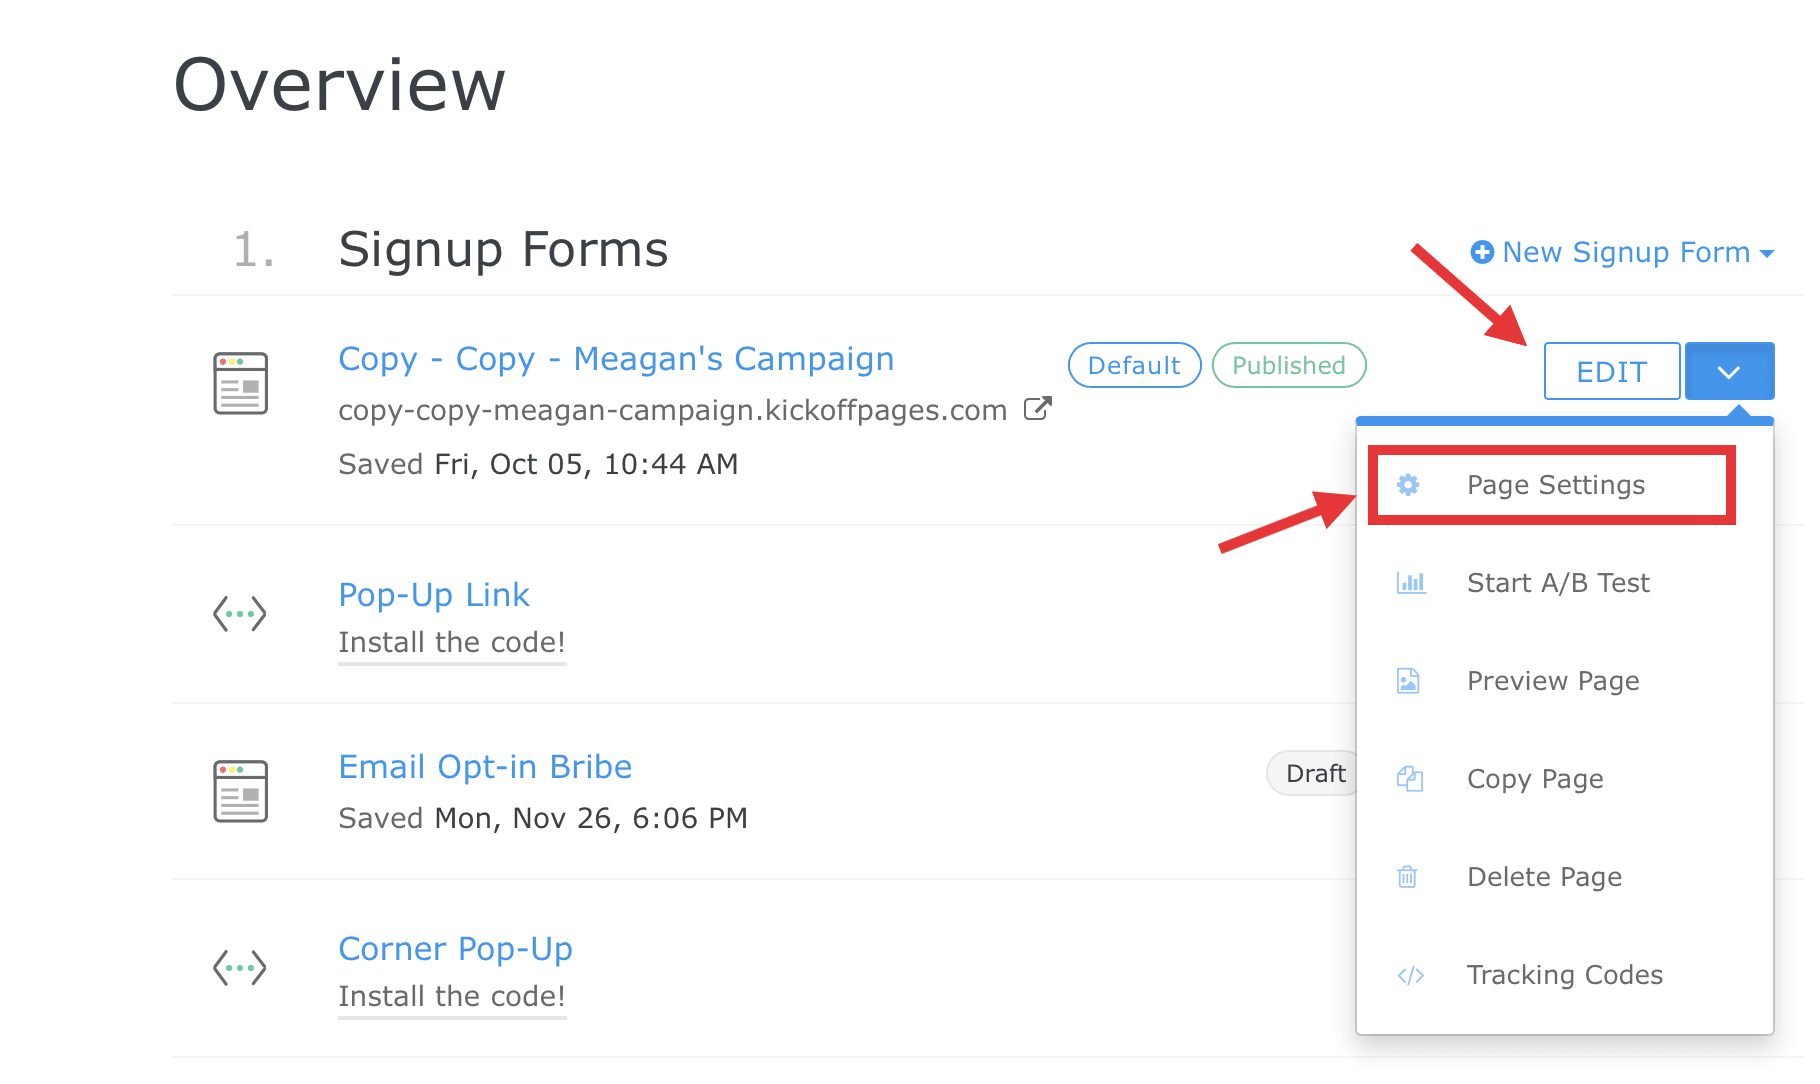 Here you will find your domain options. Select “Change URL.”
 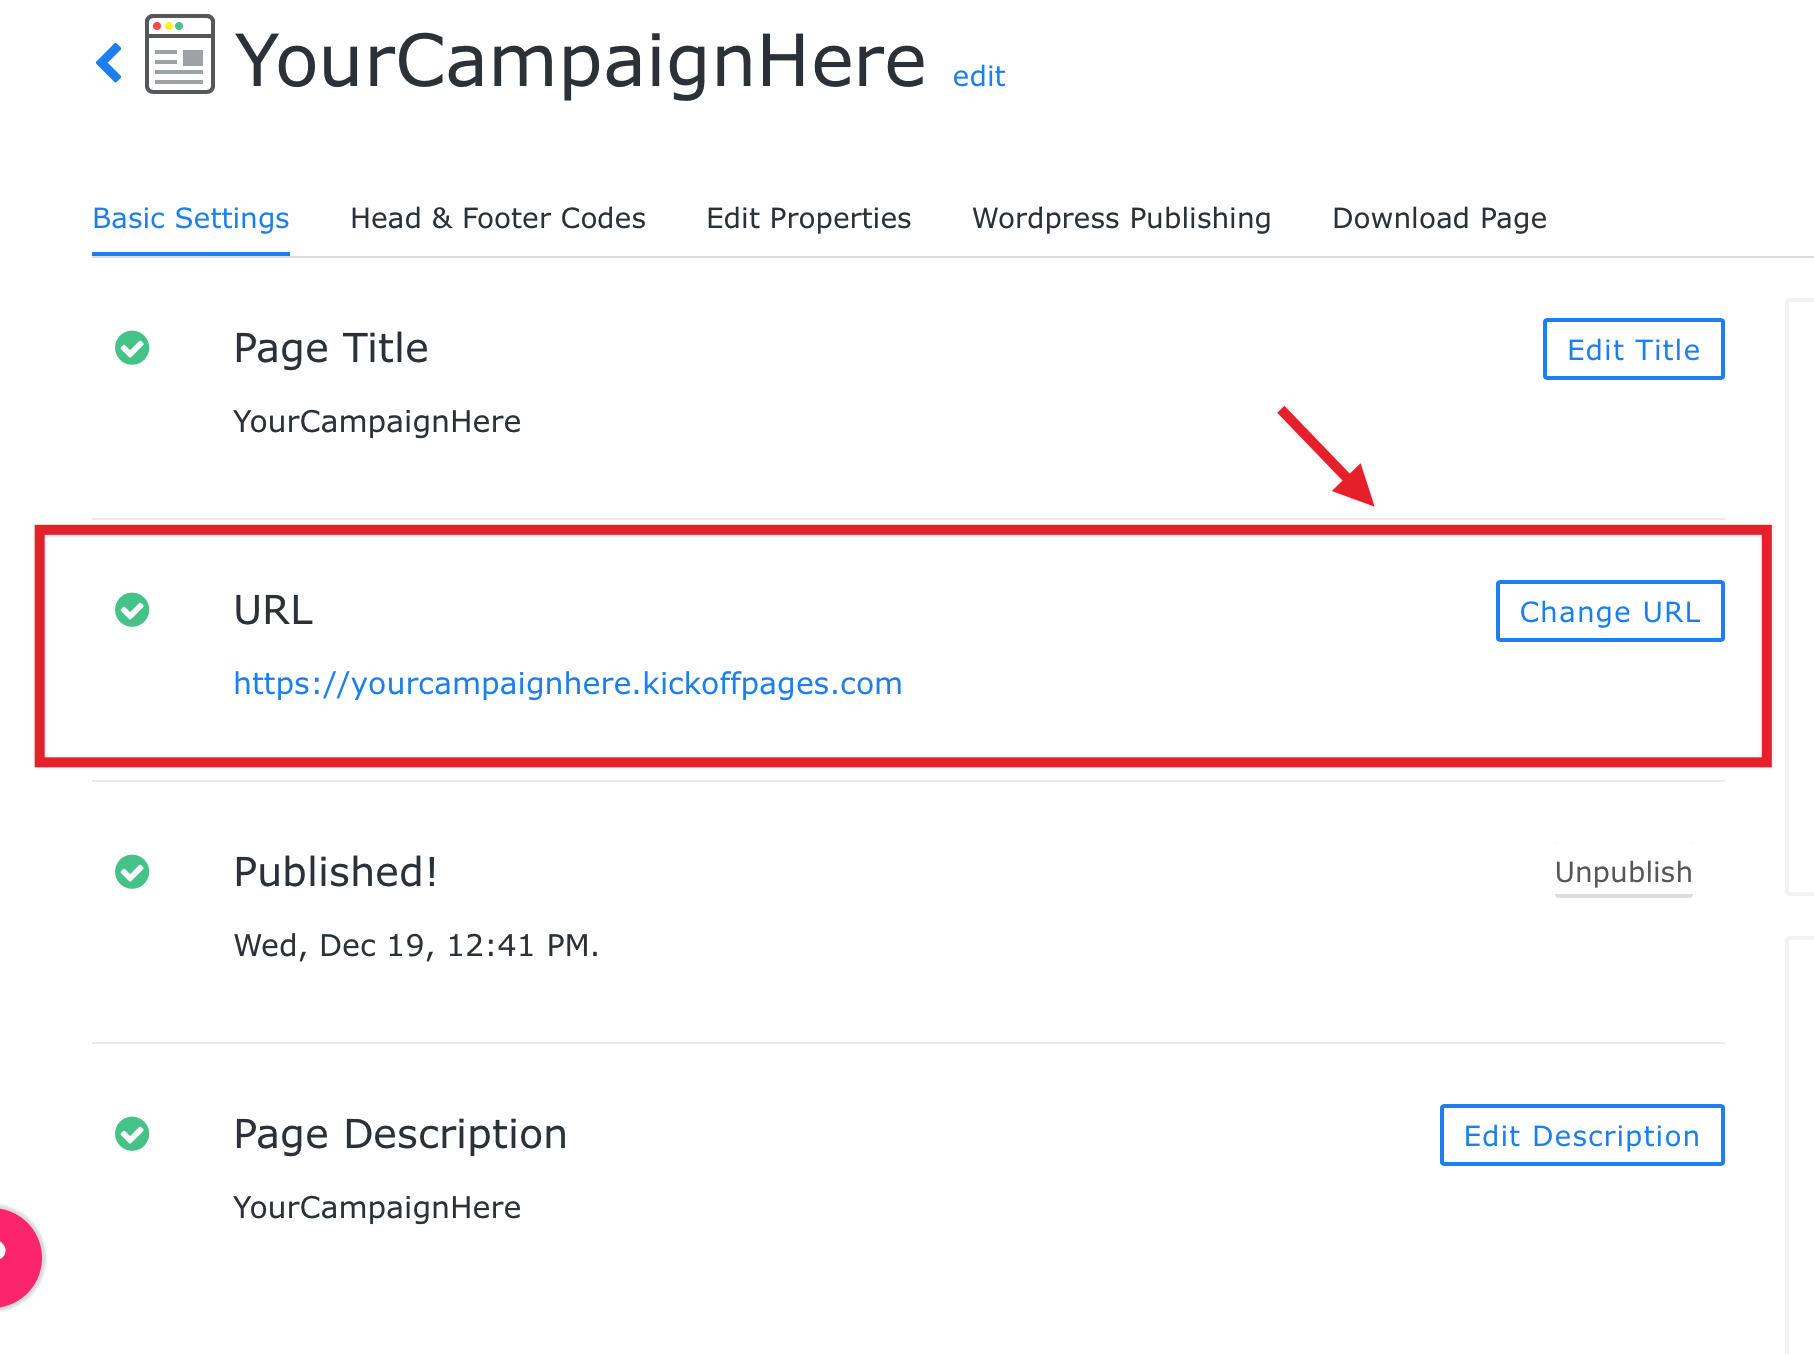 You should now see this menu:
 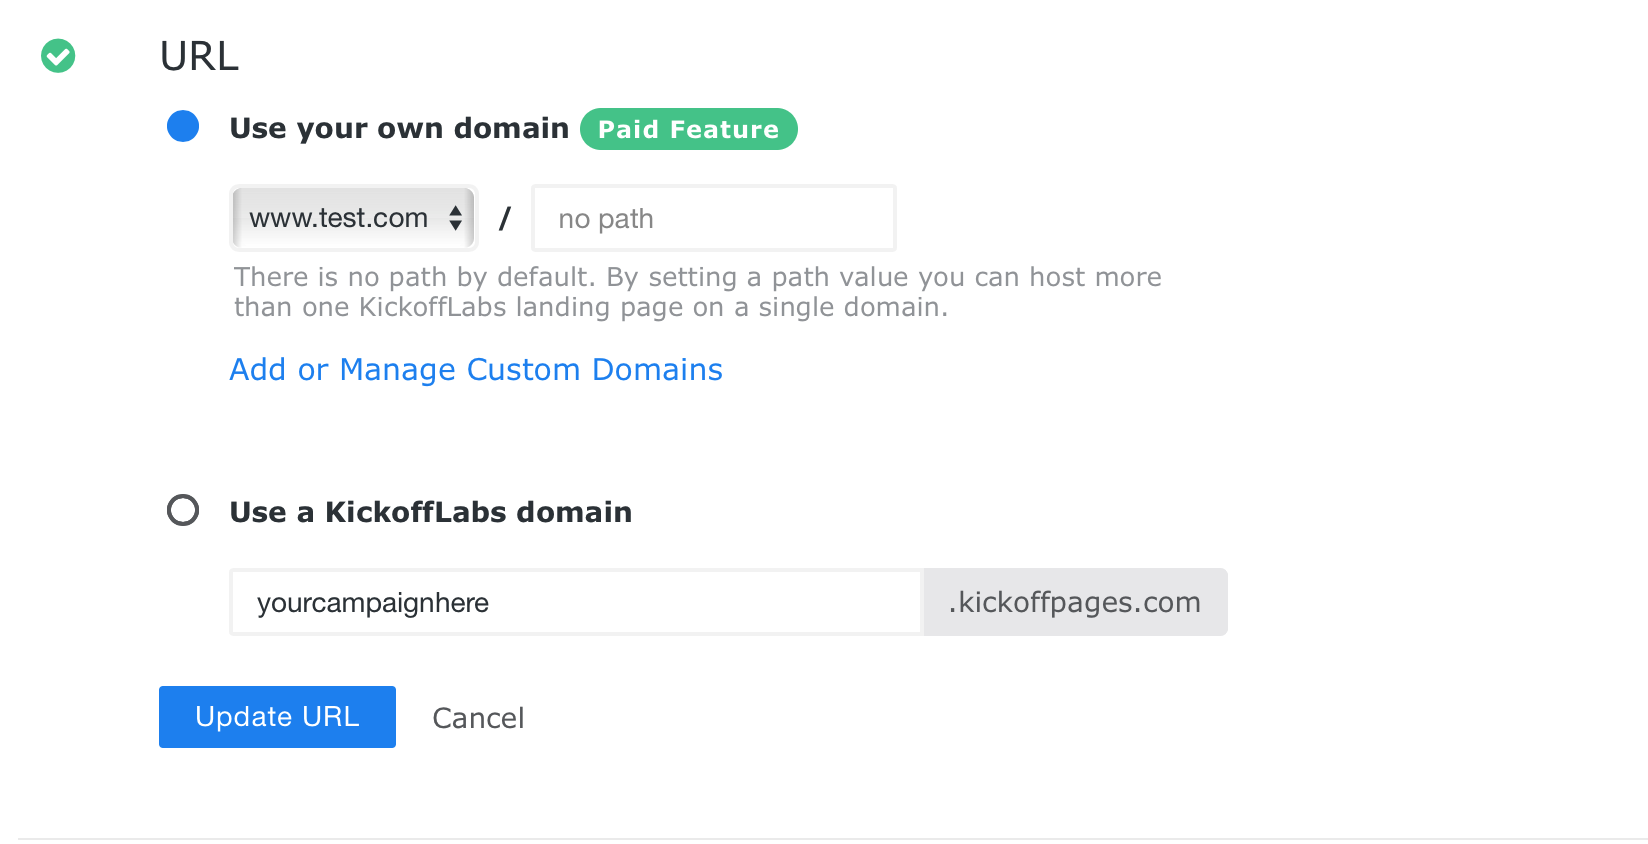 If you wish to add a path, you can do so in the available field that appears after selecting your custom domain. This is used when you want to publish multiple pages to the same domain. For example, your signup page is published to www.example.com and your thank you page is published to www.example.com/thanks - the path field is optional. Once you’ve finished updating your chosen URL, click the blue “Update URL” button. That’s it! Congratulations! Your page is now live on the Internet at your custom domain. Having trouble? Find our custom domain troubleshooting guide here!
What to check after
Section titled “What to check after”- Confirm the setting, export, integration, or message changed where you expected in KickoffLabs.
- If this affects leads, forms, referrals, emails, or integrations, submit a fresh test lead and verify the result end-to-end.
- Save the campaign URL, test lead email, screenshots, and any error messages before contacting support.
Publish to a Custom Domain on 1and1
Section titled “Publish to a Custom Domain on 1and1”This article will show you how to add or change CNAMEs for your KickoffLabs landing pages when using 1&1 as your domain host. Get started adding the CNAME record to your 1and1 DNS settings here **Things to note: **CNAME changes can take up to 48 hours to fully propagate across the entire web. Once it’s ready, you can ensure your pages are published where you want by making sure your domain is added to KickoffLabs and your landing pages are using your custom domain. You can also find directions from 1 and 1 for setting up a subdomain and creating a CNAME entry.
Now you can publish a landing page to your newly added Custom Domain.
Section titled “Now you can publish a landing page to your newly added Custom Domain.”- **Back in your KickoffLabs Dashboard, **choose the campaign and locate the landing page you want to publish. Click the arrow cog on the far right side of the page name and select “Page Settings” from the dropdown. next, select “Change URL.”
- **Select your custom domain from the dropdown menu. **You can also add a path to the page in the 3rd field (like /thanks or /thank-you for the thank you page). This is optional, but allows you to publish multiple pages to the same subdomain.
- Then click ‘Publish Landing Page’. If you have trouble setting up your domain, or have any questions in general send an email to support@kickofflabs.com
Publish to a Custom Domain on Bluehost
Section titled “Publish to a Custom Domain on Bluehost”This article will help you add CNAME records on your root domain for your landing pages when using Bluehost as your domain host. Follow Bluehost’s guide on adding a CNAME record here. If you have trouble setting up your domain, or have any questions in general send an email to support@kickofflabs.com
Publish to a Custom Domain on cPanel
Section titled “Publish to a Custom Domain on cPanel”Setting up your own domain name to use with KickoffLabs is easy. If you bought a domain name AND hosting from a service (usually like from a domain provider like HostGator), you will need to configure your DNS within cPanel.
Here’s how to setup your custom domain in cPanel for use with
Section titled “Here’s how to setup your custom domain in cPanel for use with”KickoffLabs: These instructions are for setting up the “www” version of your site with KickoffLabs. To publish to a subdomain OTHER THAN www (like launch.example.com, signup.example.com, etc.), you first need to create the subdomain inside of cPanel. After doing so, you can follow along to Cpanel’s steps here.
Now you can publish a landing page to your newly added Custom Domain.
Section titled “Now you can publish a landing page to your newly added Custom Domain.”- **Back in your KickoffLabs Dashboard, **choose the campaign and locate the landing page you want to publish. Click the Settings cog on the far right side of the page name and select “Page Settings” from the dropdown.
- **Select your custom domain from the 2nd dropdown menu. **You can also add a path to the page in the 3rd field (like /thanks or /thank-you for the thank you page). This is optional, but allows you to publish multiple pages to the same subdomain.
- Then click ‘Publish Landing Page’. If you have trouble setting up your domain, or have any questions in general send an email to support@kickofflabs.com
Publish to a Custom Domain on DreamHost
Section titled “Publish to a Custom Domain on DreamHost”This article will help you add/change CNAME records for your landing pages when using DreamHost as your domain host. Follow Dreamhosts step by step guide here to add the CNAME record to your DNS settings. It can take up to 48 hours for changes made to your DNS record to take effect.
Now you can publish a landing page to your newly added Custom Domain.
Section titled “Now you can publish a landing page to your newly added Custom Domain.”- **Back in your KickoffLabs Dashboard, **choose the campaign and locate the landing page you want to publish. Click the arrow cog on the far right side of the page name and select “Page Settings” from the dropdown. Then select “Change URL.”
- **Select your custom domain from the 2nd dropdown menu. **You can also add a path to the page in the 3rd field (like /thanks or /thank-you for the thank you page). This is optional, but allows you to publish multiple pages to the same subdomain.
- Then click ‘Publish Landing Page’. If you have trouble setting up your domain, or have any questions in general send an email to support@kickofflabs.com
KickoffLabs Custom Domain and CloudFlare DNS
Section titled “KickoffLabs Custom Domain and CloudFlare DNS”For this walkthrough, the domain we are setting up is KickoffLabsFlare.com. First, we need to login to the KickoffLabs dashboard and add a domain to our account. All KickoffLabs domains must be subdomains, so we are going to add www.kickofflabsflare.com.
Now, within CloudFlare, you will need to enter 2 CNAME records. Please note, there are different options required for each of them. CNAME 1: Our primary landing page domain - www.kickofflabsflare.com
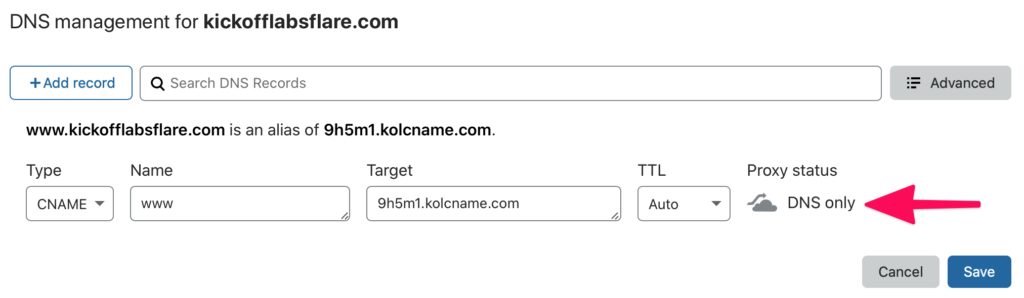
We need to have the following settings:
-
Type = CNAME
-
Name = www
-
Target = yourcustomvalue.kolcname.com
-
TTL = auto
-
Proxy Status = DNS Only The last item, “Proxy Status” is essential. For your domain to work on KickoffLabs, you need to disable the CloudFlare proxy feature (and it cannot be later enabled). CNAME 2: If you want your root-level domain (kickofflabsflare.com) to redirect your landing page, you will need to add one additional CNAME:
-
Type = CNAME
-
Name = @
-
Target = yourcustomvalue.kolcname.com
-
TTL = auto
-
Proxy Status = Proxied
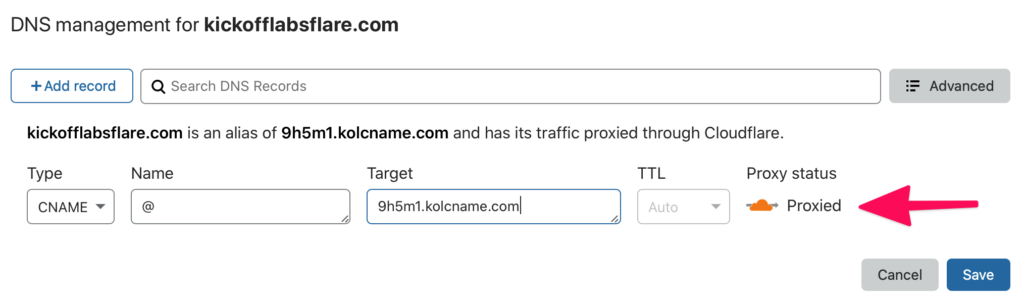
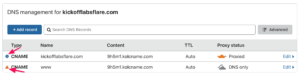
These are the same settings we entered previously except for Name we entered “@“ and this time we leave the proxy feature enabled This domain will not host your page. Instead, we will create a redirect so that anyone who manually enters our root level domain finds their way to our landing page. You may notice two icons next to your CNAME records. These are expected and highlight you are using CNAME flattening (see below) and that one of your records is not being proxied.
For this to fully work, we have one more step; CloudFlare page rules.

CloudFlare’s page rules are a powerful way to customize your DNS further. In our case, we will use it to redirect any traffic from our root domain (the second record you added above) to our primary domain. Just enter the following data (but use your domain) into the page rule form.
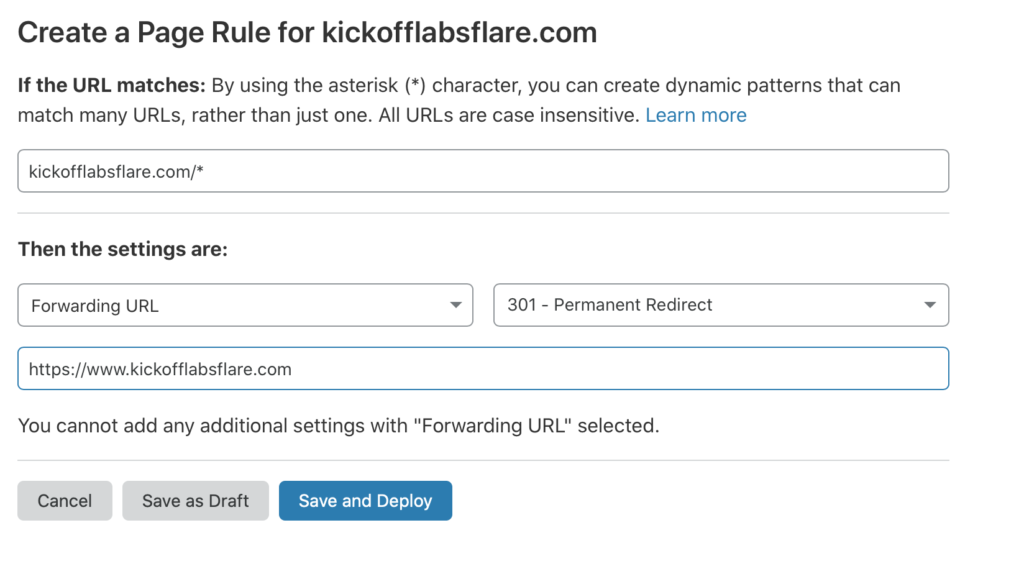
The critical part here is the “*” after the initial domain. Here we are telling CloudFlare at all requests to this root domain should be redirected. Some notes about CloudFlare:
- The redirect above will technically work without the second CNAME. However, the benefit of adding the second CNAME is it will work with SSL (https://) as well.
- The second CNAME cannot point to anywhere and can technically be any record. We need to tell CloudFlare there should be a proxied record that will cause CloudFlare to generate an SSL certificate for us. We recommend pointing it at KickoffLabs so that it is consistent.
- You may be thinking, “I thought we were not supposed to use CNAMEs on root level domains”. You are correct. This is still generally not something you want to do. However, CloudFlare has a specific feature called “CNAME flattening” that allows you to use a CNAME the same way you would traditional using an IP address.
Publish to a Custom Domain on Namecheap
Section titled “Publish to a Custom Domain on Namecheap”This article will help you add/change CNAME records for your landing pages when using Namecheap as your domain host.
Logging on and Accessing DNS Manager:
Section titled “Logging on and Accessing DNS Manager:”- Log on to your account and click on My Account and select Manage Domains,
- Under Domain Name, click on the domain name you wish to modify
- Click on All Host Records under Host Management menu on the left side of the screen You will then be taken to a page where you can add/change CNAME’s.
Setting a CNAME: Enter your unique CNAME under the IP ADDRESS/URL field on the www row o…
Section titled “Setting a CNAME: Enter your unique CNAME under the IP ADDRESS/URL field on the www row o…”f the Host Name and select CNAME (Alias) from the RECORD TYPE dropdown menu. * To find your CNAME in your KickoffLabs account: Go to the “Account” tabs and select “Custom Domains” from the drop-down menu. Your CNAME will be listed under the “Points To” column.* Setting up your sub-domain is done in a similar way. For this example, using signup as your subdomain, you would enter signup under the SUB-DOMAIN SETTINGS field, your custom domain (see instructions on locating above) under the IP ADDRESS/URL field and select CNAME (Alias) from the RECORD TYPE dropdown menu, 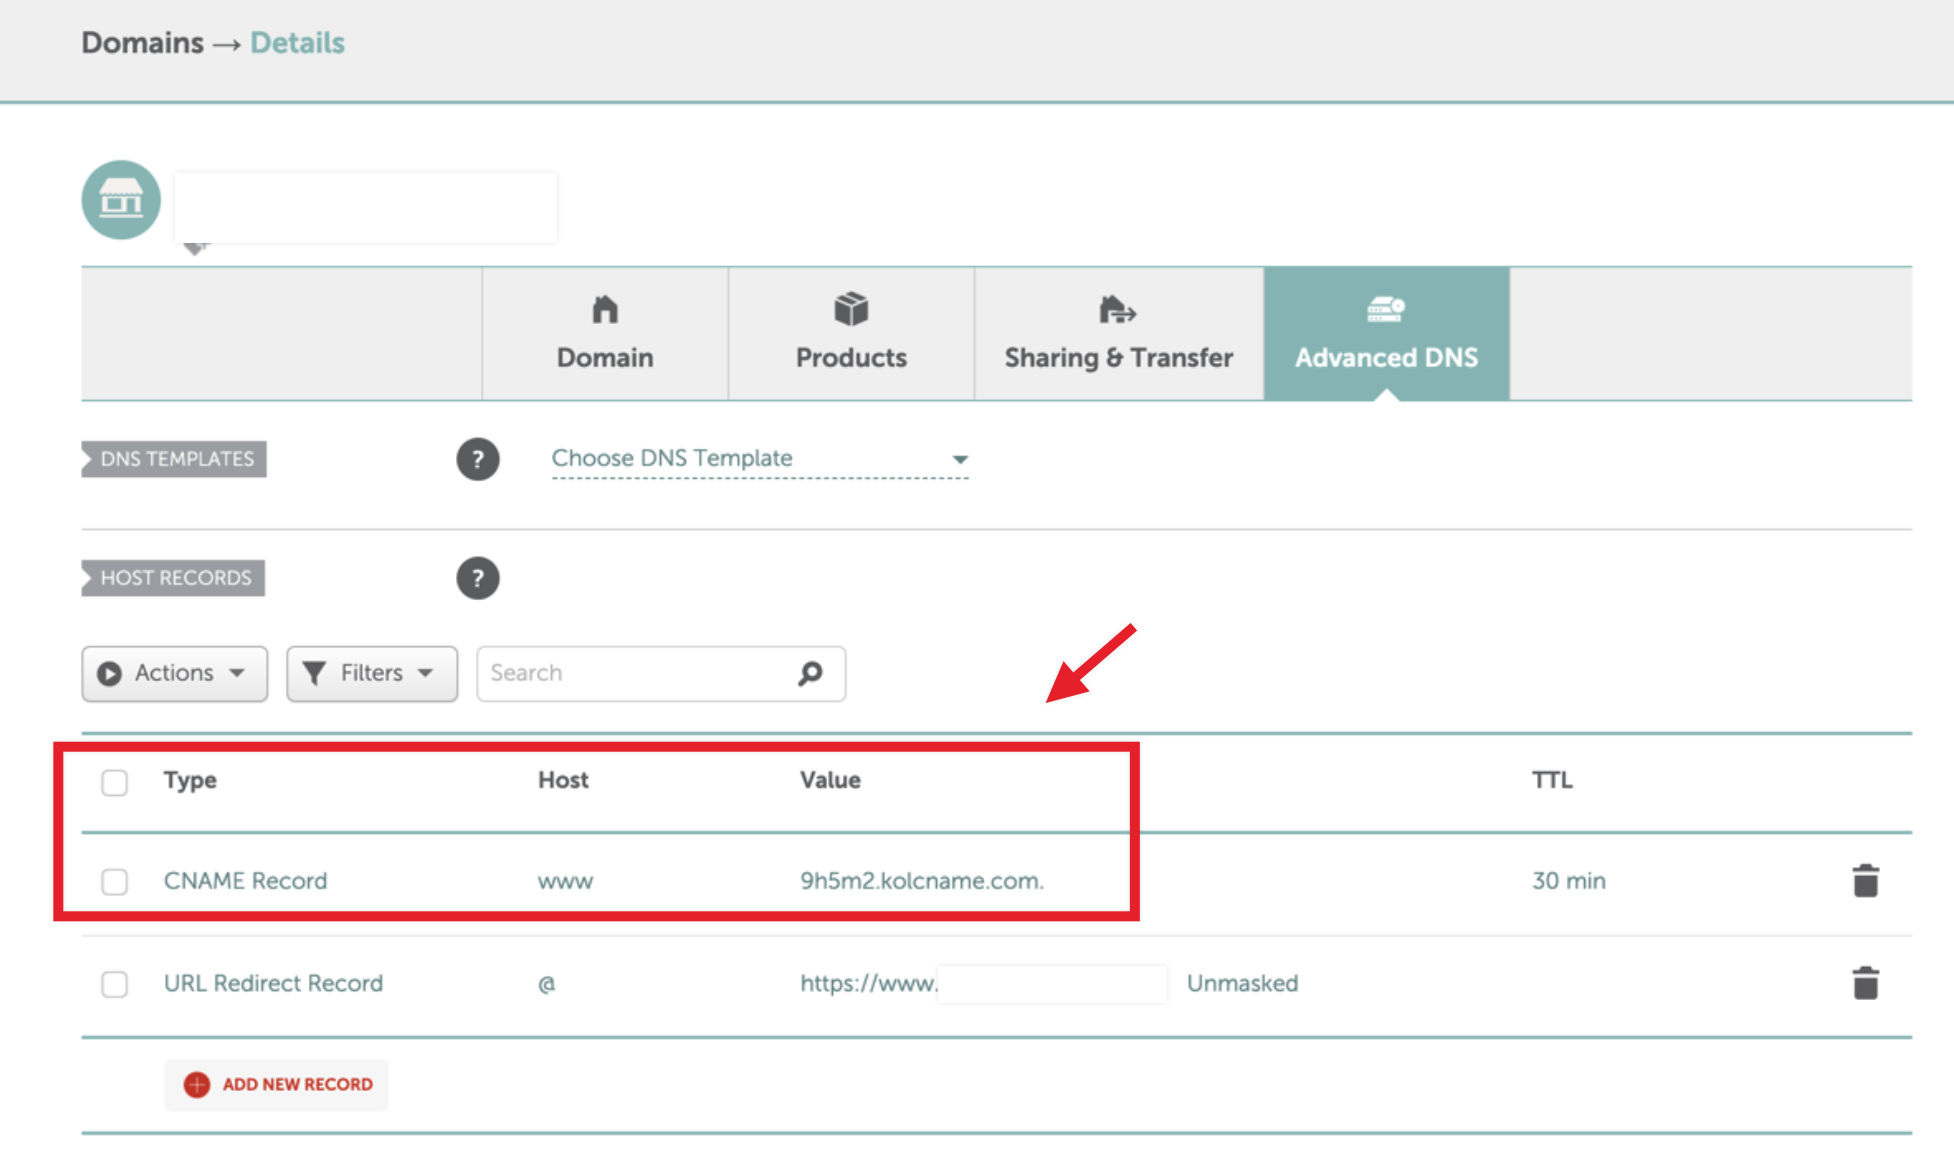
Scroll down and click on Save Changes to accept the records.
Now you can publish a landing page to your newly added Custom Domain.
Section titled “Now you can publish a landing page to your newly added Custom Domain.”- **Back in your KickoffLabs Dashboard, **choose the campaign and locate the landing page you want to publish. Click the arrow cog on the far right side of the page name and select “Page Settings” from the dropdown. Then scroll to publishing and select “Change URL.”
- **Select your custom domain from the 2nd dropdown menu. **You can also add a path to the page in the 3rd field (like /thanks or /thank-you for the thank you page). This is optional, but allows you to publish multiple pages to the same subdomain.
- Then click ‘Publish Landing Page’. Important Note for Customers with Existing Domains: It may take a little while for the DNS changes to fully propagate. How long depends on your the TTL of your DNS provider. A safe estimate is usually double what time it says. During this time anything you have published to this domain will still be available. If you have trouble setting up your domain, or have any questions in general send an email to support@kickofflabs.com
Publish to a Custom Domain on Google Domains
Section titled “Publish to a Custom Domain on Google Domains”This article will help you add CNAME records on your domain for your landing pages when using Google Domains as your domain provider.
- Sign in to your Google Domains account.
- Select “My Domains” from the left menu.
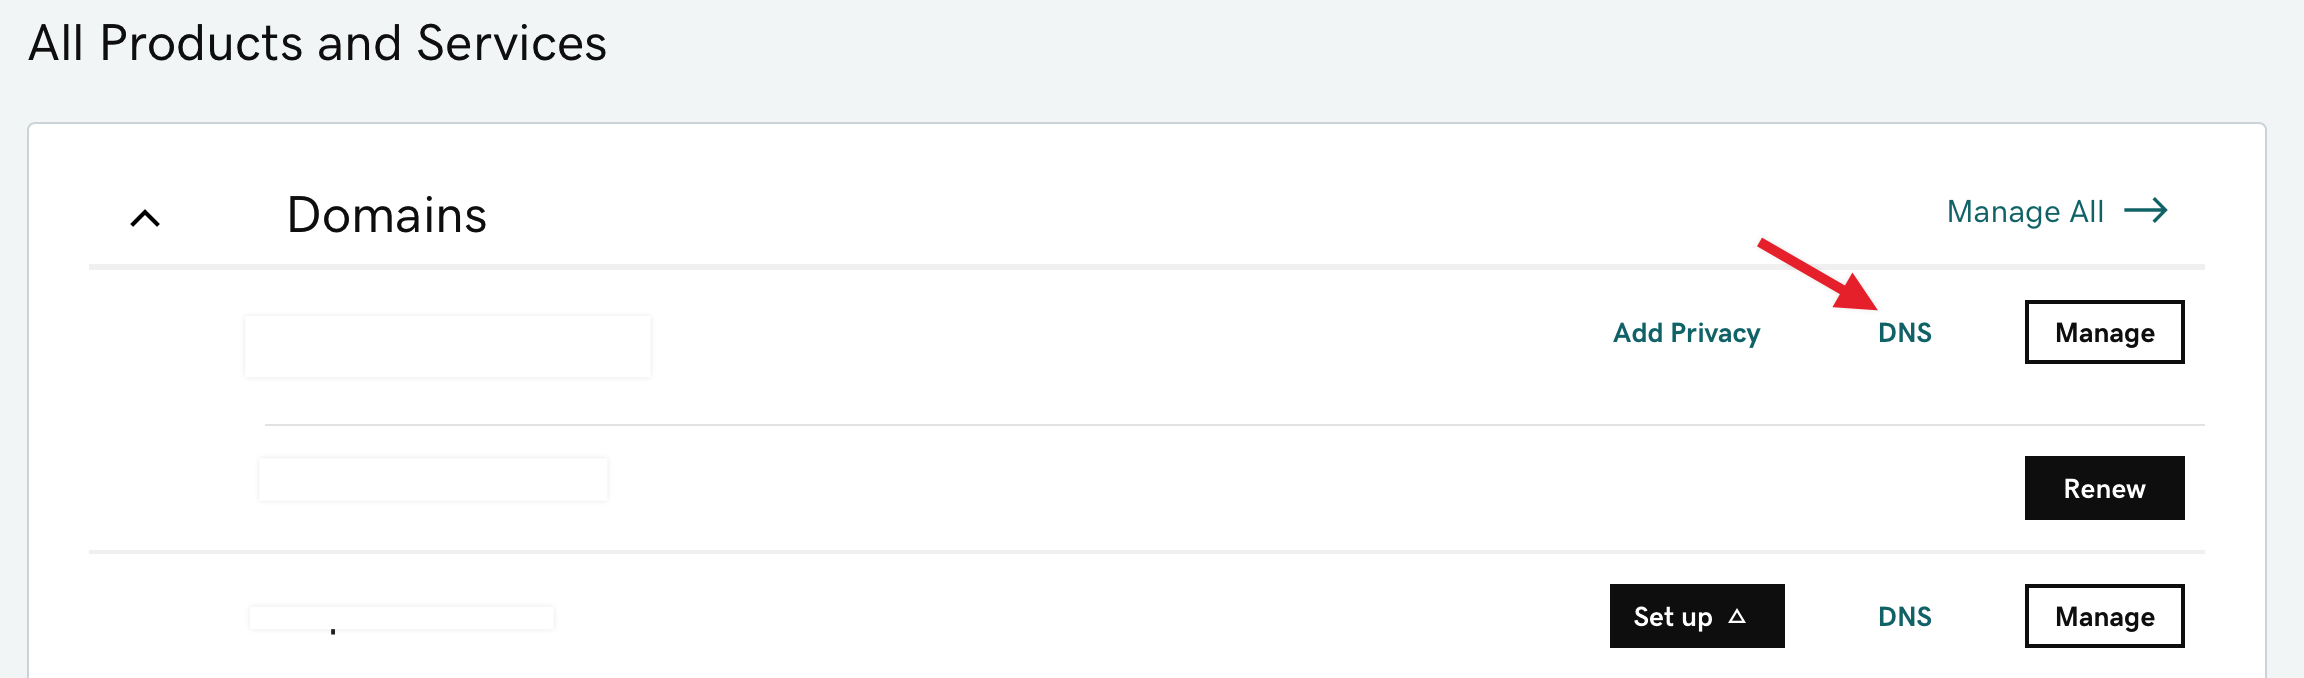
- Find the domain you want to update in the list and click the “DNS” option
- Follow Google’s steps to add your CNAME record to your DNS settings.
Now you can publish a landing page to your newly added Custom Domain.
Section titled “Now you can publish a landing page to your newly added Custom Domain.”- **Back in your KickoffLabs Dashboard, **choose the campaign and locate the landing page you want to publish. Click the Arrow key on the far right side of the page name and select “Page Settings” from the dropdown.
- **Select your custom domain from the 2nd dropdown menu. **You can also add a path to the page (like /thanks or /thank-you for the thank you page). This is optional, but allows you to publish multiple pages to the same subdomain.
- Then click ‘Publish Landing Page’.Please note any DNS changes can take up to 48 hours to take effect. If you have trouble setting up your domain, please take a screenshot of your DNS settings and send an email to support@kickofflabs.com
Publish to a Custom GoDaddy Domain Name
Section titled “Publish to a Custom GoDaddy Domain Name”By default, your published landing pages are hosted on the KickoffLabs domain, however you may want to publish to your own domain to give customers a sense of security, since they trust your brand. Let’s take a GoDaddy account and go over the steps necessary to publish your landing pages there. First you need to add your custom domain name to your KickoffLabs Custom Domains. **1. In your KickoffLabs Dashboard, click on the ‘Custom Domains’ Tab. ** This example shows how to setup the “www” version of your site with KickoffLabs. This is usually the case when you want to use a KickoffLabs landing page as your primary website. If you’d rather setup a subdomain for your landing pages, such as contests.yourdomain.com or signup.yourdomain.com click here to visit the article on how to set this up. 2. We’ll be adding a custom domain name for the first time, so let’s type our domain address into the text field and then click ‘Add New Domain Name’. At this point we get instructions for what we need to do to make sure the setup works correctly. This requires adding a CNAME record to your domain registrar. Let’s jump over to GoDaddy to make those changes.
GoDaddy Redirect a Primary Domain to a Subdomain Before leaving GoDaddy, you may want to…
Section titled “GoDaddy Redirect a Primary Domain to a Subdomain Before leaving GoDaddy, you may want to…”set up a basic redirect so that people visiting the primary domain (the non “www” version of your site) will be redirected to the subdomain. Follow Godaddy’s steps here to set-up the forwarding.
Now you can publish a landing page to your newly added GoDaddy Custom Domain.
Section titled “Now you can publish a landing page to your newly added GoDaddy Custom Domain.”- **Back in your KickoffLabs Dashboard, **choose the campaign and locate the landing page you want to publish. Click the arrow cog on the far right side of the page name and select “Page Settings” from the dropdown.
- **Select your custom domain from the 2nd dropdown menu. **You can also add a path to the page in the 3rd field (like /thanks or /thank-you for the thank you page). This is optional, but allows you to publish multiple pages to the same subdomain.
- **Then click ‘Publish Landing Page’. ** If you have trouble setting up your domain, or have any questions in general send an email to support@kickofflabs.com
Publish to a Custom GoDaddy Subdomain
Section titled “Publish to a Custom GoDaddy Subdomain”Publish to a Custom GoDaddy Subdomain If you want to publish your
Section titled “Publish to a Custom GoDaddy Subdomain If you want to publish your”KickoffLabs landing page to a custom GoDaddy subdomain address other than “www”, here are the steps to do so. This is usually the case when you have an existing website but would like to implement a smart campaign strategy with landing pages. Please note, when using a subdomain other than www, it’s NOT necessary to include www with the subdomain.1. First choose the name of a subdomain you’d like to use and add it to your KickoffLabs ‘Custom Domains’ tab, located in the drop-down menu of the “Accounts” tab. 2. Access your GoDaddy account and click on ‘Domains’, then click ‘Launch’ for the domain that you’d like to set up. 3. Add a CNAME record (Follow Godaddy’s steps on adding a CNAME record here)4. In the ‘Host’ field, type in the name of your subdomain.For the ‘Points to’ field, add in the KickoffLabs address which is your unique CNAME. To Access your CNAME: Go to your KickoffLabs account and select “Custom Domains” from the drop-down menu of the “Account” tab. Your CNAME will be located in the “points to column.” 5. Be sure to save your changes! Please note that DNS changes can take up to 24 hours to take effect.
Now you can publish a landing page to your newly added GoDaddy Custom Domain.
Section titled “Now you can publish a landing page to your newly added GoDaddy Custom Domain.”- ** Back in your KickoffLabs Dashboard, **choose the campaign and locate the landing page you want to publish. Click the arrow cog on the far right side of the page name and select “Page Settings” from the dropdown. Then select “Change url.”
- **Select your custom domain from the 2nd dropdown menu. **You can also add a path to the page in the 3rd field (like /thanks or /thank-you for the thank you page). This is optional, but allows you to publish multiple pages to the same subdomain.
- Then click ‘Publish Landing Page’. If you have trouble setting up your domain, or have any questions in general send an email to support@kickofflabs.com
How To Forward a Naked Domain in GoDaddy
Section titled “How To Forward a Naked Domain in GoDaddy”Now that you’ve connected your custom domain to KickoffLabs, there is an extra step involved to forward the naked domain (ex: KickoffLabs.com) to the url with the www (ex: www.kickofflabs.com). You’ll want to set this up if you want users to have the ability to view your pages without having to type out the www. If you haven’t connected your custom domain yet, be sure to first follow the steps here Publish to a Custom GoDaddy Domain Below we’ve created a step by step guide to get this configured in GoDaddy.
-
Login to GoDaddy and select the domain that you want to work on
-
Select “DNS”
-
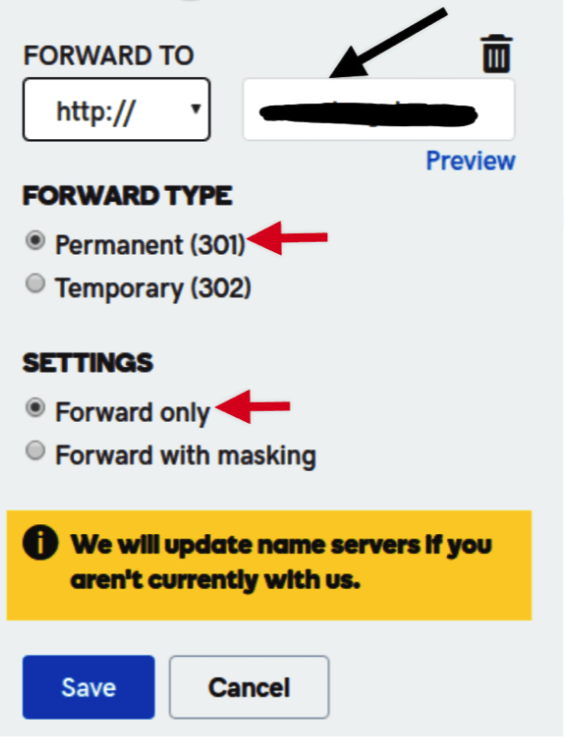
Scroll down toward the bottom of the page to the “Forwarding” section
-
Select “Add” next to “Domain”
-
Enter your domain with the www.
-
Click to save your changes.
That’s it! It can take a few minutes for the DNS changes to take effect, but users will now be able to visit your pages without typing the www. You may need to clear your cache/history to see the changes. Please note that external services update their UI/settings without notice. It’s always best to check out Godaddy’s help center for the most up to date information: https://www.godaddy.com/help/forward-my-domain-12123
How to Forward a Naked Domain in Namecheap
Section titled “How to Forward a Naked Domain in Namecheap”Now that you’ve connected your custom domain to KickoffLabs, there is an extra step involved to forward the naked domain (ex: KickoffLabs.com) to the URL with the www (ex: www.KickoffLabs.com) You’ll want to set this up if you want users to have the ability to view your pages without having to type in the www. If you haven’t connected your custom domain yet, be sure to first follow the steps here: Adding a CNAME Record in Namecheap Follow the steps to forward your naked domain in Namecheap here
SSL Encryption (HTTPS) on Custom Domains
Section titled “SSL Encryption (HTTPS) on Custom Domains”SSL Encryption is now available on all custom domains. To enable it on your domain just add domain in the KickoffLabs dashboard, set the CNAME to your custom CNAME and we will do the rest. ***Note: You can find your Custom CNAME by going to the “Account” tab and clicking on “Custom Domains” from the dropdown, then “Check Status & Manage.” Your CNAME will be in the “Points To” column. *** If you had previously set up a domain on KickoffLabs and would like to take advantage of SSL, please contact support@kickofflabs.com. A couple of points about the HTTPS/SSL functionality:
- Before enabling this feature, please be sure all of the assets on your pages (external images/videos/etc) are available via HTTPS/SSL. Any resources referenced via HTTP will cause a browser warning and could scare off a lead.
- If you already have your page running on the proxy.kickofflabs.com CNAME it may take a little while for the DNS changes to fully propagate. How long depends on your the TTL of your DNS provider. A safe estimate is usually double what time it says. During this time anything you have published to this domain will still be available. However, HTTPS will not be available until the DNS changes have fully propagated.
- For existing domains, do NOT change your DNS without first having your domain migrated in the dashboard. Failure to do this may cause your page to be unavailable.
- All built in KickoffLabs assets already support HTTPS and generally default to it.
- All KickoffLabs landing pages and sign up forms already communicate back to our servers via HTTPS/SSL. So your lead data is already safely transmitted back to our servers.
- You do NOT have to provide us with a SSL certificate. We will provide one for you.
- We are using Server Name Indication (SNI) for our HTTPS/SSL support. This is very widely supported at this time, but if your target market is using IE 6, you may want to skip this.
- Similar to our current custom domains, you must use a subdomain. Naked/apex domains are not currently supported.
Why doesn’t my custom domain work without the www?
Section titled “Why doesn’t my custom domain work without the www?”If you’re using your root domain for your landing pages, there is an extra step you must take when you set up your domain. In addition to adding the CNAME entry for the subdomain ‘www’, you must also add a 301 redirect which forwards your naked domain (no www) to your domain with the www. So, example.com would redirect to www.example.com If you’re using a subdomain other than ‘www’, this step is not necessary. It is not recommended to use ‘www’ when using another subdomain. Below you’ll find links to setting up redirects with many of the main domain providers - the destination URL or Value should always be your domain **with **the www (www.example.com): Setting up forwarding with GoDaddy Setting up a redirect with NameCheap - use @ as your Host Setting up a redirect with cPanel - select the “Do Not Redirect www” option Setting up a redirect with BlueHost - select the “Do Not Redirect www” option Setting up a redirect with Google Domains - use @ as the subdomain Setting up a redirect with 1and1 Setting up a redirect with DreamHost Once you set up your redirect, be sure to clear your browser cache prior to testing to see if the page now works without the www. Still having trouble? Let us know at support@kickofflabs.com
Why isn’t my custom domain working?
Section titled “Why isn’t my custom domain working?”If you’re having trouble with your custom domain not working, read on to troubleshoot. Below you will find the most common causes of issues with a custom domain.
- You’ve added the domain to your KickoffLabs account, but have not yet updated your DNS Settings to point your domain to our service. To check and make sure your domain has been configured, click here, then click “Check Status & Manage” next to your domain name.
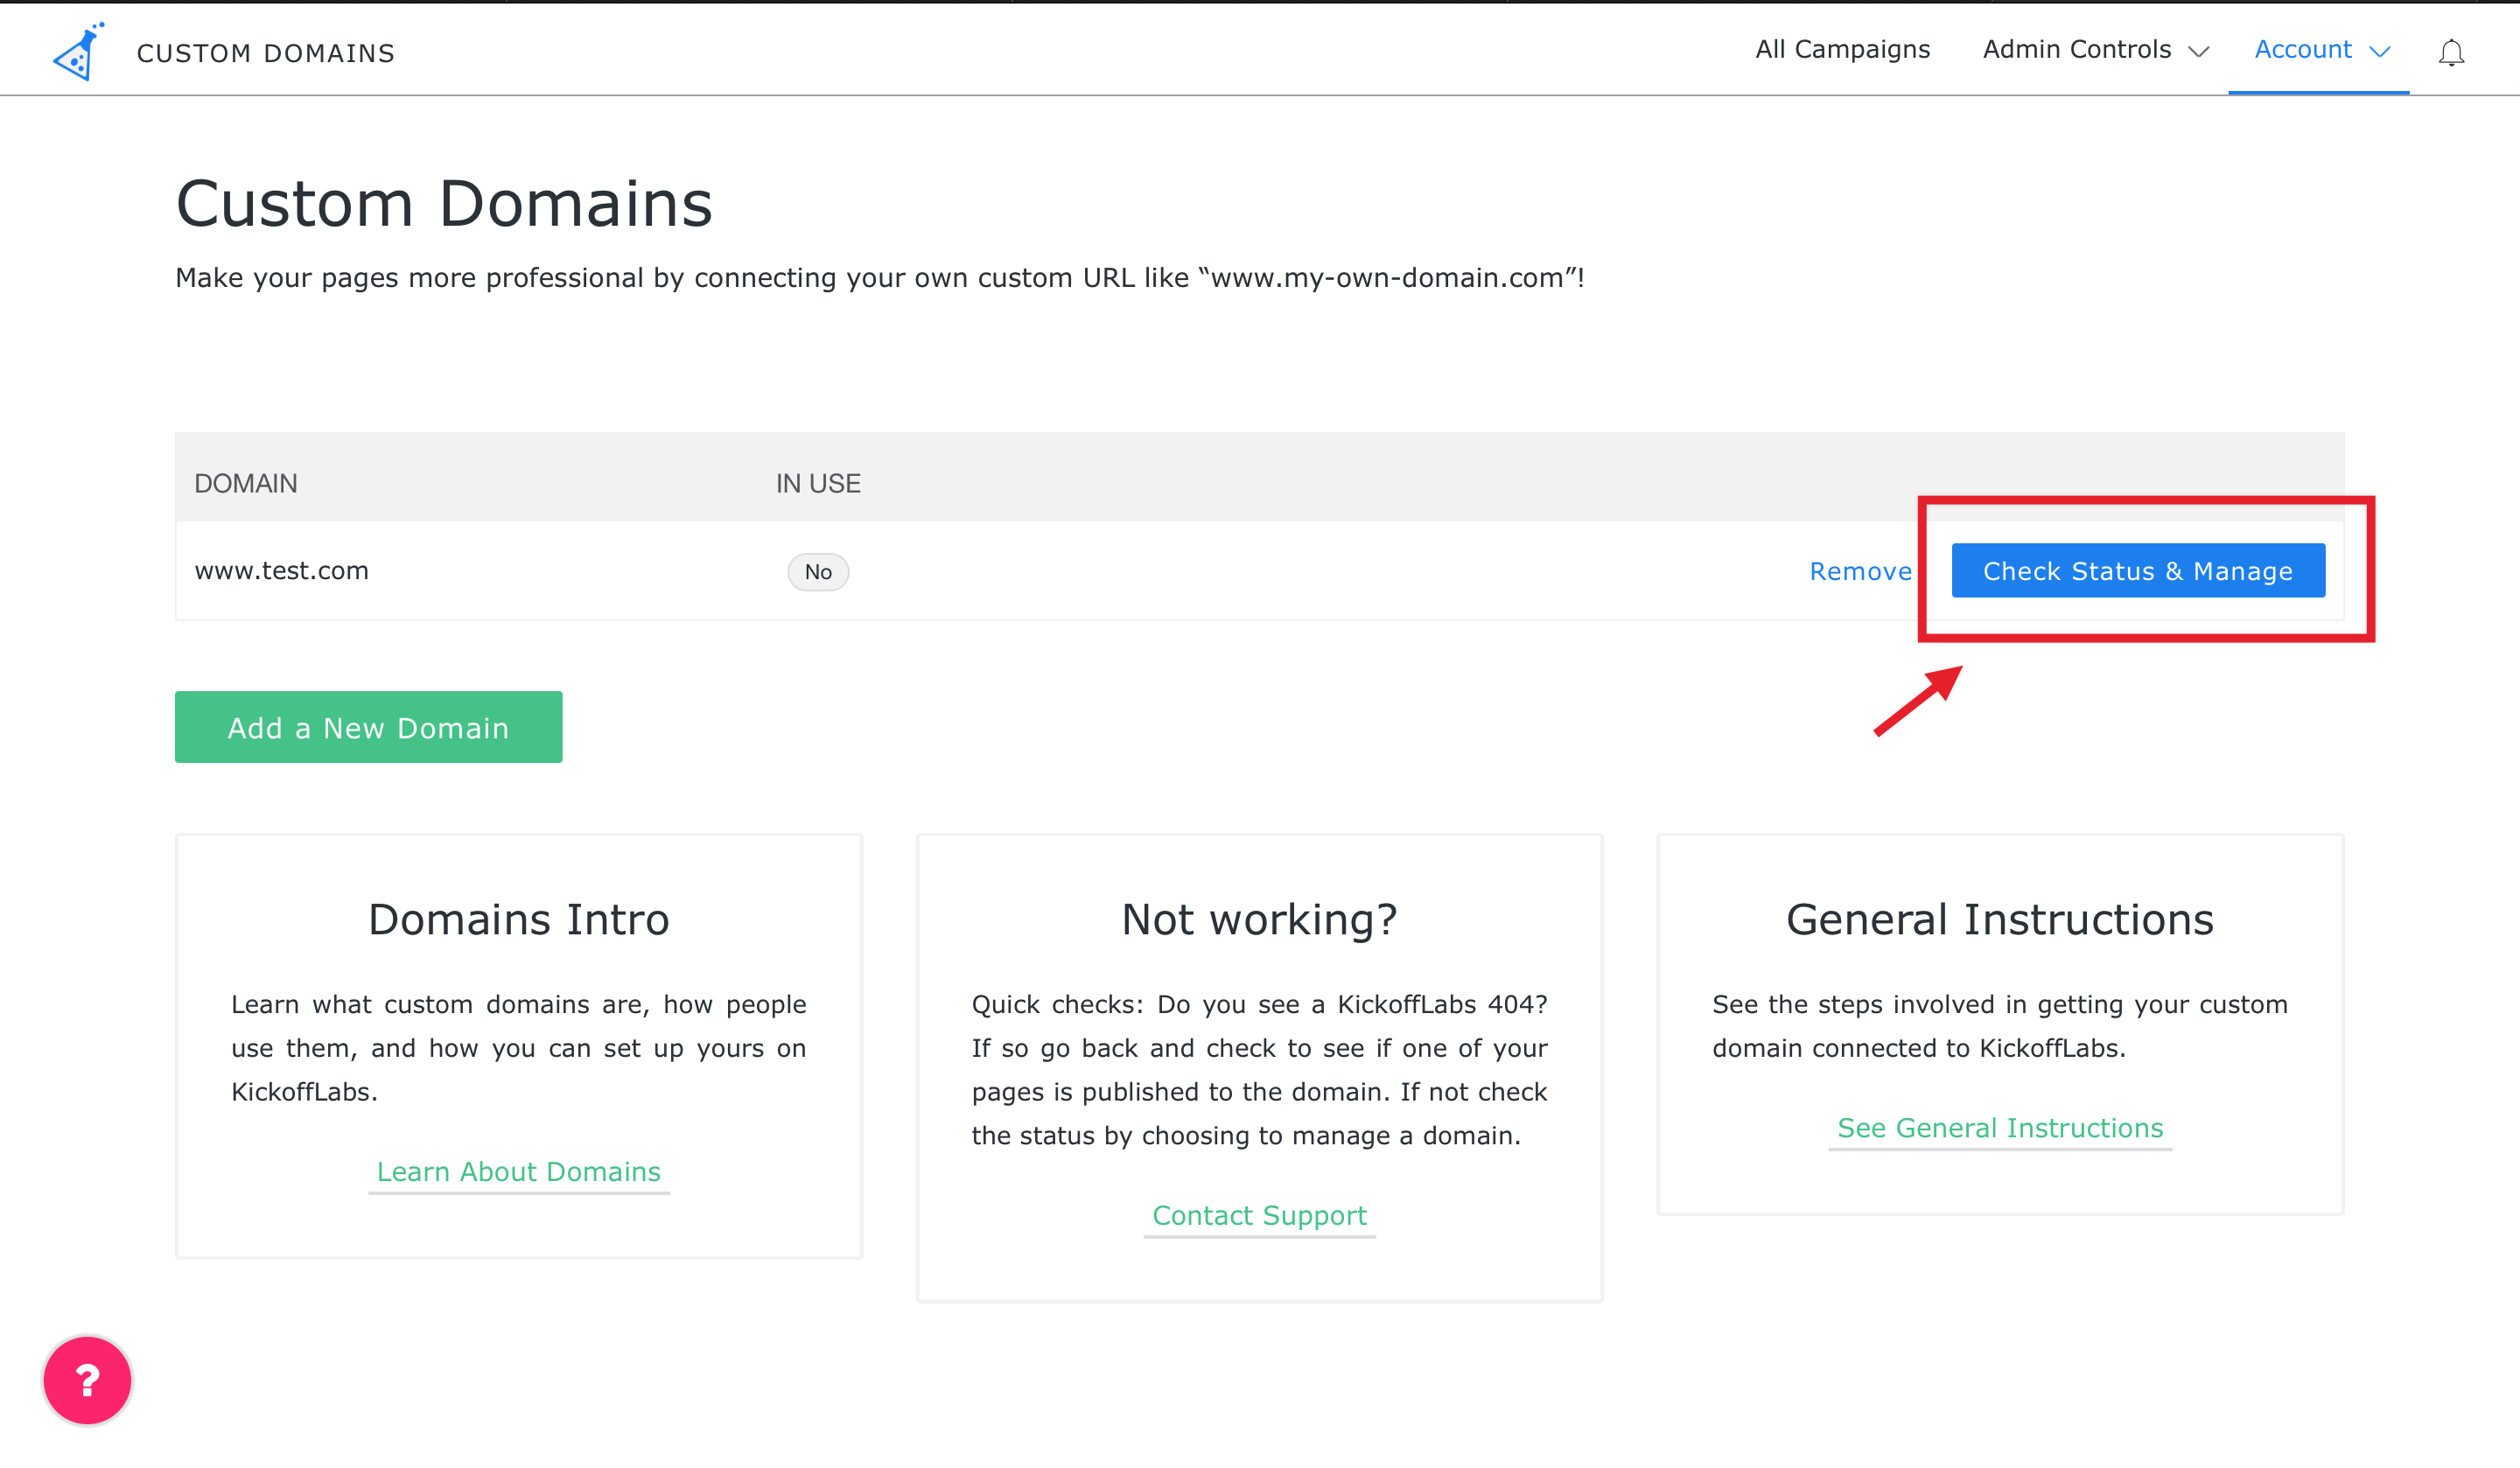
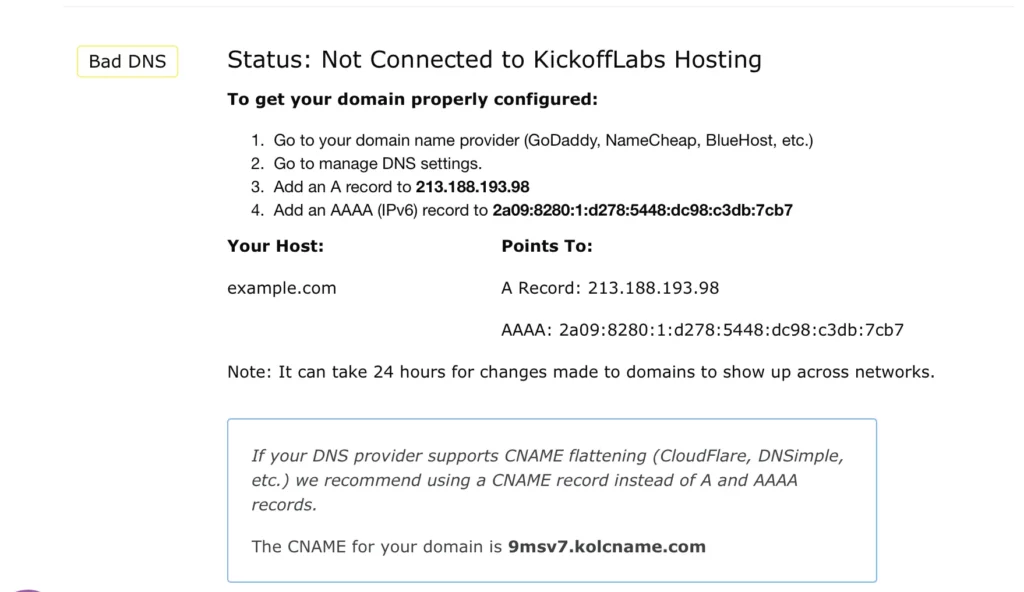
On the next page you should see something that looks like this: 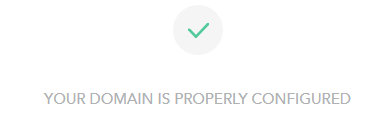
If your domain is **NOT **properly configured, you will see this - if you see this message, click here to learn how to point your domain to KickoffLabs - remember…changes to your DNS Settings must be made wherever your nameservers are pointing (this is typically where you purchased your domain):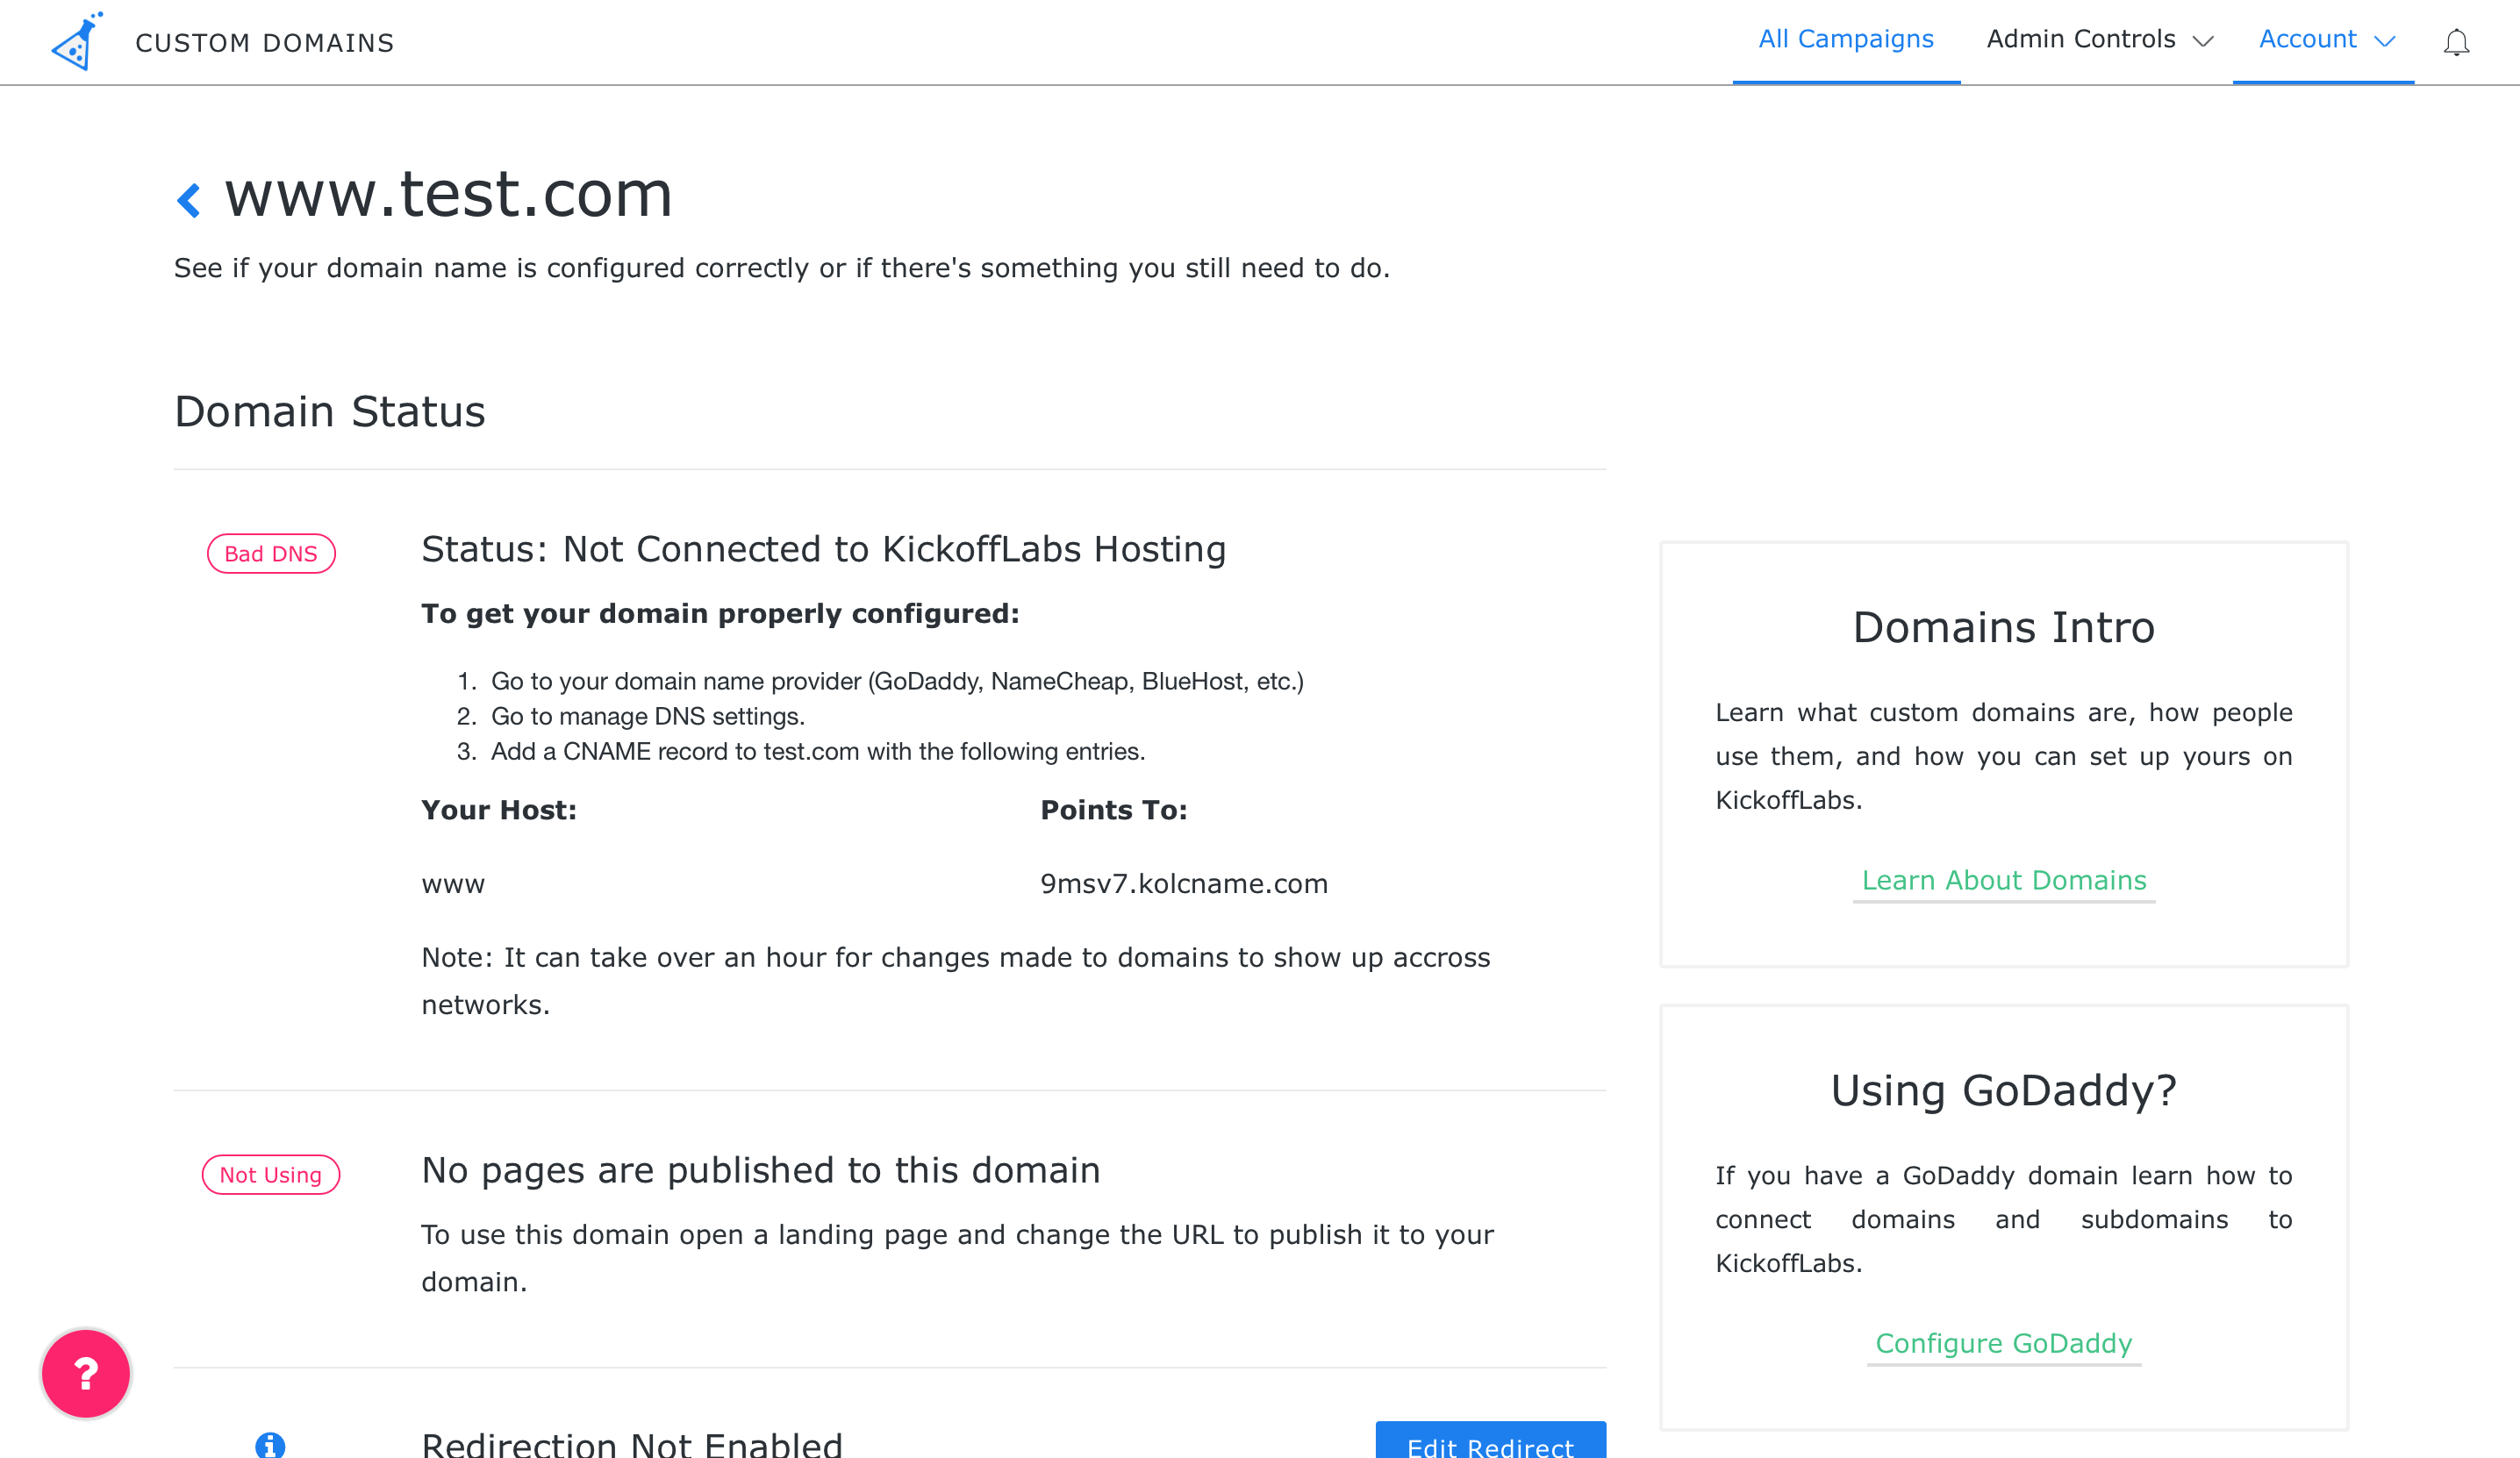
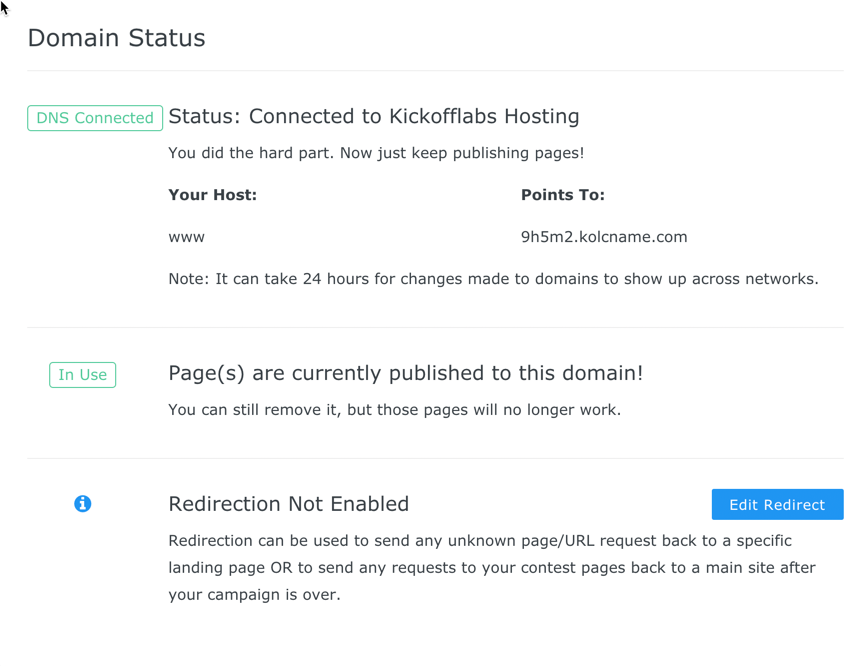
**You’ve configured your domain, but have not added it to KickoffLabs/published a page to the domain in KickoffLabs. **First check here - if you see your domain in the list, the next step is to click “Manage Domain” and ensure it’s properly configured (see above point). If you see the “Domain is Properly Configured” alert, the next step is to make sure you’ve published a page to your domain in KickoffLabs. Click here to learn how to publish a page to your custom domain.
- **Your domain works with the www, but not without. **The point applies if you’re using your root domain. We don’t recommend using www with a subdomain (like www.signup.kickofflabs.com). If you’re using the root domain and your site doesn’t work without the www, make sure you’ve set up a redirect with your domain provider. Find our guide for this here!
- **If your domain has been added to your account, is properly configured, and you have published at least one page to the domain, clear your browser cache or use an incognito browsing window to test your URL. **Oftentimes browsers will cache older versions of websites. For this reason, you always want to be sure you clear your browser cache before testing, especially if you’ve just made a big change. Alternatively, you can also test using an incognito browsing window. If all of the above have been tried and you’re still having trouble with your domain, please send us a message to support@kickofflabs.com In your message, please include your account Email address, the domain you’re having trouble with, who your domain provider is, and screenshots of any changes you made to your DNS Settings.
How to setup a custom domain redirect for unknown pages
Section titled “How to setup a custom domain redirect for unknown pages”If you have a custom domain connected to KickoffLabs you can also setup a general redirect if a page or path doesn’t exist. This could also be useful if you’ve ended a campaign and just want to unpublish all the pages, but have any customers that find the link redirected to an alternate site. Why would this be useful?
-
Creating a custom 404 page if a page isn’t found as part of your contest.
-
If you ended a contest, but want the links people may find to go to another site or contest instead.
-
Sending any random page requests back to the main contest site. How to setup the redirect
-
Click Account > Custom Domains in the top right of your dashboard.
-
Click “Manage” on the domain. you want to setup a redirect.
-
Click “Edit Redirect”
- Set the domain redirect and optionally choose to keep the path in the URL when it’s redirected to the new URL.
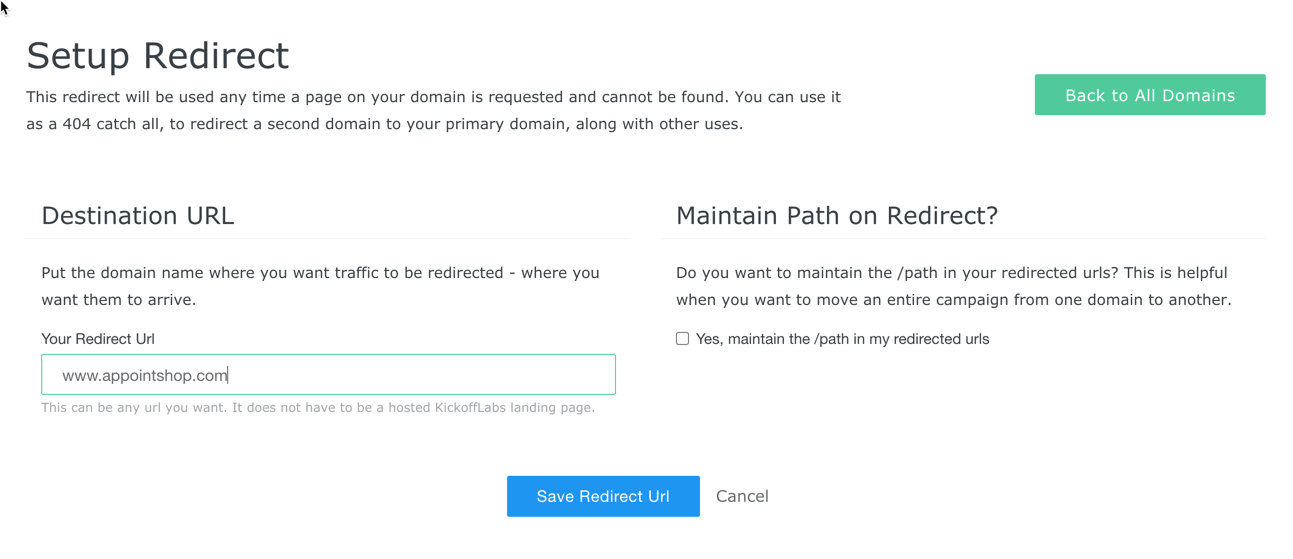
- Save. Now any requests to that domain that don’t have KickoffLabs pages published to them will be redirected instead of showing the general KickoffLabs 404 page.
What to check after
Section titled “What to check after”- Preview the campaign or page after making changes.
- Submit a fresh test lead when the change affects forms, referrals, points, integrations, or tracking.
- Save the campaign URL, test lead email, screenshots, and any error messages before contacting support.
Need help? Email support@kickofflabs.com with your campaign URL, the lead email you tested with, and a screenshot of what you expected to happen.